Everyday Living
30 November 2008
Thank You to My Advertisers: 11/23-11/29
As of November 2009, I will no longer be with Entrecard, so in order to free-up valuable file space, I have removed the images and contents from this page. I apologize for any inconvenience this may cause. However, I invite you to stop by my main page and see if there is anything of interest to you...
Everyday Living
Everyday Living
27 November 2008
My Lemonade Award
A few weeks ago, I was awarded the Lemonade Award by Chronic Chick Talk and I want to thank her for thinking of me. I apologize for taking so long to respond to this prestigious award and will waste no further time in passing it along.

Da Rules:
* Put the logo on your blog or post.
* Nominate at least 10 blogs which show great Attitude and/or Gratitude!
* Be sure to link to your nominees within your post.
* Let them know that they have received this award by commenting on their blog.
* Share the love and link to this post and to the person from whom you received your award.
As always, I understand that some may not be able to participate. The purpose of these awards is to acknowledge the hard work and dedication you put into your blogs.
I also want to thank The epitome of invincibility & confidence for awarding me the coveted Butterfly Award. Thank you very much for thinking of me.
25 November 2008
My Thanksgiving Gravy
Here is what I did last year for my gravy. I am changing it a bit this year, so I'll have to see how it goes. However, according to a trial gravy I made using chicken stock, it should turnout pretty good.
What you will need...
Turkey drippings
Flour
Butter...unsalted, please
Cardamom...To taste
Salt/Chicken Bullion Cube (crushed)...To taste
Pepper...To taste
For adding the flour and the butter, I use a 1:1 ratio...1 Tbsp of butter to 1 Tbsp of flour to 1 Cup of liquid. I will be writing this recipe to accommodate 3 Cups of turkey drippings...
The Gravy Groove...
Troubleshooting...
Gravy seems to be missing something...I usually crush a chicken bouillon cube and add it to the gravy. This seems to correct the problem. If not, try adding some chicken stock or experiment with a little crushed sage or a very tiny amount of mace.
Gravy is not thick enough...In a separate bowl spoon in about a half cup of your gravy and whisk an additional Tbsp of flour. Once well incorporated and no lumps visible, add it back into the main gravy and whisk well. Bring to a boil. If this does not thicken it to your liking, repeat until you get the your desired consistency.
What I am doing different this year...
I am replacing the cardamom with a spice called Grains of Paradise. I purchase it whole and then grind the amount I will use. My "trial run" with the chicken stock turned out very well, so I figured I would give it a shot on the Big Day. I'll let you know how it goes.
Of interest...How to Cook Your Thanksgiving Turkey
What you will need...
Turkey drippings
Flour
Butter...unsalted, please
Cardamom...To taste
Salt/Chicken Bullion Cube (crushed)...To taste
Pepper...To taste
For adding the flour and the butter, I use a 1:1 ratio...1 Tbsp of butter to 1 Tbsp of flour to 1 Cup of liquid. I will be writing this recipe to accommodate 3 Cups of turkey drippings...
The Gravy Groove...
- Try and separate the fat from the turkey drippings
- In a sauce pan over medium heat, melt 3 Tbsp butter
- Once melted, add 3 Tbsp of flour and whisk to combine
- Now is decision time. How dark do you want your gravy, because the longer you stay at this step, the darker your gravy will be. I like my gravy the same color as my hair, blond. So, I whisk over medium heat for about 5 minutes
- Once you reach your desired color, slowly add the 3 cups of turkey drippings; whisking constantly
- add pepper and cardamom (cardamom has a rather strong flavor, so I like to start with this small amount and continue adding until I reach the desired flavor...start with a 1/2 tsp
- Continue adding the pepper and cardamom, until you are happy with the flavor.
- Continue whisking until the gravy boils (This is when it will reach its full thickening potential)
- You should end up with a very tasty, lump-free gravy
- If you need to delay service, take some plastic wrap and set it directly on top of the gravy. This will help prevent the wonderful "skin" from forming
Troubleshooting...
Gravy seems to be missing something...I usually crush a chicken bouillon cube and add it to the gravy. This seems to correct the problem. If not, try adding some chicken stock or experiment with a little crushed sage or a very tiny amount of mace.
Gravy is not thick enough...In a separate bowl spoon in about a half cup of your gravy and whisk an additional Tbsp of flour. Once well incorporated and no lumps visible, add it back into the main gravy and whisk well. Bring to a boil. If this does not thicken it to your liking, repeat until you get the your desired consistency.
What I am doing different this year...
I am replacing the cardamom with a spice called Grains of Paradise. I purchase it whole and then grind the amount I will use. My "trial run" with the chicken stock turned out very well, so I figured I would give it a shot on the Big Day. I'll let you know how it goes.
Of interest...How to Cook Your Thanksgiving Turkey
24 November 2008
How to Cook Your Thanksgiving Turkey
This post will show you how I prepare the guest of honor...
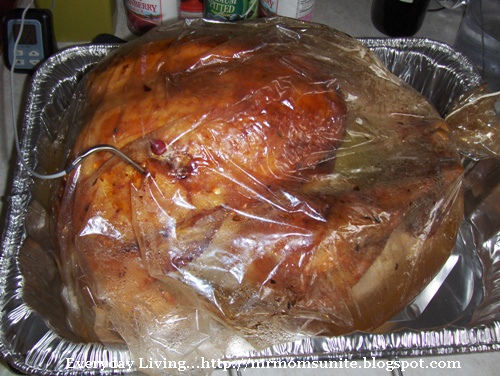
What you will need
Turkey...any size, we usually get between 20-25 lbs.
Turkey bag...used in the baking process
Turkey Pan
Meat Thermometer (the kind that can be read from outside the oven. Has a probe and then a cable that leads to the thermometer).
Flour...1 Tbsp
Compound Butter...Click here for recipe
Oranges...2-3
Onions...any leftover from other recipes
Celery...any leftover from other recipes
Herbs...any leftover from other recipes
Cooking the Bird
Here is a thermometer like the one I use. Very good and versatile...


Next...Gravy
What you will need
Turkey...any size, we usually get between 20-25 lbs.
Turkey bag...used in the baking process
Turkey Pan
Meat Thermometer (the kind that can be read from outside the oven. Has a probe and then a cable that leads to the thermometer).
Flour...1 Tbsp
Compound Butter...Click here for recipe
Oranges...2-3
Onions...any leftover from other recipes
Celery...any leftover from other recipes
Herbs...any leftover from other recipes
Cooking the Bird
- First remove the surprise packages in the neck and the body cavity
- Wash the bird inside and out
- Remove the pop-up thermometer
- These things are set to pop at 185°. Your bird will continue to cook while resting and the final internal temperature will be around 195° or more. This will give you a turkey that is less moist than I prefer. I use my own thermometer and remove the turkey at about 165° to 170°, which will give you a nice, moist turkey that is also well-cooked (final temperature around 175° to 180°).
- Take the Turkey bag and put the flour inside it, then shake to coat the bag
- Work your fingers between the skin and the breast on both sides...making a cavity
- Take the compound butter, slice it, and insert in the cavities you created
- Once the cavities are filled, cut the oranges in half and squeeze juice over the turkey
- Place used oranges inside the body cavity
- Place a few slices of your compound butter inside
- Place any extra herbs, onions, celery, etc, inside the body cavity
- These are used ONLY as aromatics and are NOT to be eaten
- These additions will help flavor the turkey as it bakes
- Place the bird in the turkey bag, cut of few slits in the bag, and place on pan
- Insert thermometer, through the bag, into the thickest portion of the bird
- Place the turkey in the oven and cook according to the directions
- When the thermometer reaches 165°- 170° remove the turkey and let rest at least 30 minutes
- Your turkey will continue to cook and carry-over will continue to raise the temperature an additional 10 degrees
- Remove aromatics and discard
- It will looked burned where the compound butter was placed, but believe me, it isn't
- You should end up with a nice, moist turkey with a great flavor
Here is a thermometer like the one I use. Very good and versatile...

Next...Gravy
23 November 2008
Tangy Whipped Potatoes
This is how I make the potatoes for Thanksgiving. The buttermilk is going to give the potatoes a nice, tangy flavor.
What you will need:
Potatoes...10 pounds (1 bag)
Butter...1/2 to 1 stick
Salt...to taste
Pepper...to taste
Buttermilk...1/2-1 cup
Parmesan Cheese...1-2 cups
Putting it Together
- Skin potatoes and cut into quarters (this allows the potatoes to cook more quickly)
- Put in large pot, add water and salt (I usually put in a few chicken bouillon cubes to add a little flavor to the potatoes).
- When fork tender, remove from heat and drain
- Turn-off burner and replace potatoes in pot and return to burner. This will allow the excess water to steam out of the potatoes. Be sure to keep an eye on them, so they do not burn
- Place half of the potatoes in a bowl
- Add butter, salt, and pepper
- Either mash with a potato masher or use a hand mixer to blend
- Add 1/2 cup of Buttermilk and continue whipping
- Add additional buttermilk until you reach the desired consistency
- Add additional salt and pepper to taste
- Take other half of potatoes and repeat the above steps
- Add the Parmesan cheese and mix until well incorporated
Here's what they look like...

Hope you enjoy.
22 November 2008
Thank You to My Advertisers: 11/16-11/22
As of November 2009, I will no longer be with Entrecard, so in order to free-up valuable file space, I have removed the images and contents from this page. I apologize for any inconvenience this may cause. However, I invite you to stop by my main page and see if there is anything of interest to you...
Everyday Living
Everyday Living
21 November 2008
Spinach and Artichoke Stuffing
Although this is titled as a stuffing, I present and serve this dish as a casserole. I must confess that I actually made this about 4 years ago. Although it looks complicated, it is fairly easy to put together. As to how it tastes...it disappeared within minutes and there were no leftovers.
What you will need...
* extra-virgin olive oil...1/4 cup
* spinach...2 1/2 pounds , washed (3 cups cooked and roughly chopped)
* yellow onions...2 cups chopped
* garlic...1 Tbsp roughly chopped
* Emeril's Italian Essence (recipe here), or other Italian Seasoning blend...1 Tbsp plus 2 tsp
* salt...2 1/2 tsp
* black pepper...1 1/4 tsp freshly ground
* artichoke hearts...3 (8 1/2-ounce) cans quartered , any tough outer leaves removed
* eggs...2 large
* heavy cream...1 1/2 cups
* chicken stock...2 cups
* lemon juice...2 Tbsp
* French bread...12 to 14 cups cubed (1-inch) day-old (1 loaf)
* Brie...1 pound , rind removed and cut into 1/2-inch cubes
* Parmesan...1/2 cup freshly grated
* parsley leaves...1/4 cup minced fresh
Putting It Together
TIPS...To make it easier to trim the rind from the Brie, wrap the Brie in foil and place it in the freezer for about an hour. This will firm it up and make rind-extraction much easier. Also, I will be substituting the French Bread with Sour Dough bread (I love sour dough).

Emeril's Italian Essence
What you will need...
* paprika...2 1/2 Tbsp
* salt...2 Tbsp
* garlic powder...2 Tbsp
* black pepper...1 Tbsp
* onion powder...1 Tbsp
* cayenne pepper...1 Tbsp
* dried leaf oregano...1 Tbsp
* dried thyme...1 Tbsp
Putting It Together
This is a good seasoning for just about any dish.
Recipes courtesy of... Emeril Lagasse, Food Network
What you will need...
* extra-virgin olive oil...1/4 cup
* spinach...2 1/2 pounds , washed (3 cups cooked and roughly chopped)
* yellow onions...2 cups chopped
* garlic...1 Tbsp roughly chopped
* Emeril's Italian Essence (recipe here), or other Italian Seasoning blend...1 Tbsp plus 2 tsp
* salt...2 1/2 tsp
* black pepper...1 1/4 tsp freshly ground
* artichoke hearts...3 (8 1/2-ounce) cans quartered , any tough outer leaves removed
* eggs...2 large
* heavy cream...1 1/2 cups
* chicken stock...2 cups
* lemon juice...2 Tbsp
* French bread...12 to 14 cups cubed (1-inch) day-old (1 loaf)
* Brie...1 pound , rind removed and cut into 1/2-inch cubes
* Parmesan...1/2 cup freshly grated
* parsley leaves...1/4 cup minced fresh
Putting It Together
- Preheat the oven to 350 degrees F. Grease a 9 by 13-inch baking dish with 1 tablespoon olive oil.
- Bring a medium pot of water to a boil. Add the spinach and cook until just wilted, about 30 seconds. Drain and rinse with cold water. Once cool, squeeze as much water from spinach as possible, then roughly chop, and reserve.
- Heat 1 tablespoon olive oil in a large skillet over medium-high heat. Add the onions and cook until golden brown and tender, about 5 minutes.
- Add the garlic, 2 teaspoons of Italian Essence, 1/2 teaspoon salt, and 1/4 teaspoon pepper, and cook, stirring, until the garlic is fragrant, about 30 seconds.
- Add the artichokes and cook, stirring, another 2 minutes. Remove from the heat and reserve.
- Combine the eggs, cream, chicken stock, lemon juice, remaining 1 tablespoon Italian Essence, remaining 2 teaspoons salt, and remaining 1 teaspoon pepper in a large bowl.
- Whisk to combine.
- Add the bread, spinach, artichoke mixture, brie, 1/4 cup Parmesan, and parsley and stir to combine.
- If bread does not absorb all of liquid immediately then let rest until this happens, about 20 minutes.
- Pour the bread pudding mixture into the prepared dish. Sprinkle remaining 1/4 cup Parmesan over the top and drizzle with remaining 2 tablespoons olive oil.
- Bake until firm in the center and golden brown, about 1 hour. Serve warm.
TIPS...To make it easier to trim the rind from the Brie, wrap the Brie in foil and place it in the freezer for about an hour. This will firm it up and make rind-extraction much easier. Also, I will be substituting the French Bread with Sour Dough bread (I love sour dough).
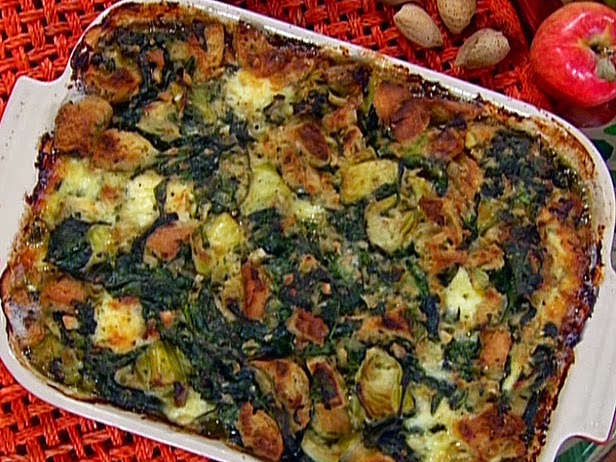
Photo courtesy of...Food Network
Emeril's Italian Essence
What you will need...
* paprika...2 1/2 Tbsp
* salt...2 Tbsp
* garlic powder...2 Tbsp
* black pepper...1 Tbsp
* onion powder...1 Tbsp
* cayenne pepper...1 Tbsp
* dried leaf oregano...1 Tbsp
* dried thyme...1 Tbsp
Putting It Together
- Combine all ingredients thoroughly and store in an airtight jar or container.
This is a good seasoning for just about any dish.
Recipes courtesy of... Emeril Lagasse, Food Network
20 November 2008
Apple Pie with Crème Fraîche and Black Pepper
What you will need:
Pie Crusts...2
Granny Smith Apples...2 1/2 lbs.
Sugar...about 3/4 cup plus 1tsp.
Fresh Lime Juice...2 Tbsp
Salt...Pinch
Black Pepper...1/4 tsp. (freshly ground, if possible)
Flour...4 Tbsp
Calvados or Brandy...1/4 Cup
Crème Fraîche...1/2 cup click here for recipe
Milk...about 1 Tbsp
Recipe courtesy of Michael Kalanty of the California Culinary Academy
This is a pie I first made 9-10 years ago. After that first year, it has since become a Thanksgiving tradition.
This pie also makes a great gift. Prepare as above, but do not bake. Make a copy of the baking instructions and include that with the pie. I believe that the smell of an apple pie baking is also a gift.
Enjoy
Next time... Spinach and Artichoke Casserole
Pie Crusts...2
Granny Smith Apples...2 1/2 lbs.
Sugar...about 3/4 cup plus 1tsp.
Fresh Lime Juice...2 Tbsp
Salt...Pinch
Black Pepper...1/4 tsp. (freshly ground, if possible)
Flour...4 Tbsp
Calvados or Brandy...1/4 Cup
Crème Fraîche...1/2 cup click here for recipe
Milk...about 1 Tbsp
- Preheat oven to 4250F
- Place 1 pie crust in pie pan
- Peel, core, and cut the apples into 1/4 inch slices (you may also cut them into cubes, if you like; I've done it both ways
- Place them in a bowl and add 3/4 cup of sugar, lime juice, salt, pepper, and flour
- Toss to coat the apples evenly
- Add the Calvados and the crème fraîche
- Toss to mix well
- Cover and let set at room temperature for 20 minutes
- Taste the mixture and add sugar if necessary
- Transfer mixture to the prepared pie pan and distribute evenly
- Brush the edge of the dough with milk and place the second crust on top and seal
- decoratively crimp the edge
- Brush the top with remaining milk and sprinkle with the remaining teaspoon of sugar
- Cut 3 vents in the top of the crust
- Place on a baking sheet and place in oven
- Bake for 15 minutes, then reduce heat to 3750F, and bake for an additional 55 minutes
- Crust should be crisp and apples tender when pierced with a knife
- Remove from oven and allow to cool 30 minutes
Recipe courtesy of Michael Kalanty of the California Culinary Academy
This is a pie I first made 9-10 years ago. After that first year, it has since become a Thanksgiving tradition.
This pie also makes a great gift. Prepare as above, but do not bake. Make a copy of the baking instructions and include that with the pie. I believe that the smell of an apple pie baking is also a gift.
Enjoy
Next time... Spinach and Artichoke Casserole
19 November 2008
Double Layer Pumpkin Pie
Since I always (his wife begs to differ with the "always" claim, since she made them last year) make the pies a few days in advance, I felt that I will begin my menu with the pies. This happens to be one of my favorite pumpkin pies. The recipe comes from my sister-in-law. I am assuming she got it from the back of a pudding or a cream cheese box.
What you will need:
Ready Made Pie Crust...1 (pre-backed)
Cream Cheese...4 oz, softened
Cool Whip...1 1/2 cups, thawed
Pumpkin...1 can, 16oz
Jello Pudding Instant Vanillas Pudding...2 packages (4 serving size)
Cold Milk...1 cup plus 1 Tbsp
Sugar...1 Tbsp
Ground Cinamon...1 tsp
Ground Ginger...1/2 tsp
Ground Cloves...1/4 tsp
The Assembly...
Now, my wife makes it with a ready-made pie crust, but you can also use graham crackers (the way I like it).
Graham Cracker Crust...
What you will need:
graham cracker crumbs...1 1/2 cups (about 20 squares)
butter...1/3 cups, melted
Measurements courtesy of Betty Crocker
Next Time...Apple Pie with Black Pepper and Crème Fraîche
What you will need:
Ready Made Pie Crust...1 (pre-backed)
Cream Cheese...4 oz, softened
Cool Whip...1 1/2 cups, thawed
Pumpkin...1 can, 16oz
Jello Pudding Instant Vanillas Pudding...2 packages (4 serving size)
Cold Milk...1 cup plus 1 Tbsp
Sugar...1 Tbsp
Ground Cinamon...1 tsp
Ground Ginger...1/2 tsp
Ground Cloves...1/4 tsp
The Assembly...
- Preheat oven to 4500
- Poke the bottom and sides of pie crust with a fork
- Back pie crust in oven for 10-12 minutes
- In a large bowl, mix Cream Cheese, 1 Tbsp of milk, 1 Tbsp Sugar until smooth
- Gently stir in Cool Whip
- Empty mixture in the bottom of the crust and spread evenly
- In another bowl, pour 1 cup of milk
- Add pumpkin, pudding mixes, and spices
- Mix well
- Spread over cream cheese layer
- Refrigerate for 4 hours or until set
Now, my wife makes it with a ready-made pie crust, but you can also use graham crackers (the way I like it).
Graham Cracker Crust...
What you will need:
graham cracker crumbs...1 1/2 cups (about 20 squares)
butter...1/3 cups, melted
Measurements courtesy of Betty Crocker
- Combine the graham cracker crumbs and melted butter and combine
- Mix well
- Layer bottom and sides of pie pan
Next Time...Apple Pie with Black Pepper and Crème Fraîche
18 November 2008
Thanksgiving Prep
 There are a few items that need to be done a few days beforehand. One is to make a compound butter, which will be used in the turkey and the other is to make Crème Fraîche, which is to be used in the Apple Pie. I will be making the compound butter on Saturday to allow the flavors in the herbs to blend with the butter. I will be making the Crème Fraîche on Sunday, so it will be ready when I make the pies on Tuesday.
Compound Butter:
Things you'll need:
Butter...1 lb. (4 sticks) unsalted, please
Fresh Sage...1 Tbsp
Fresh Rosemary...1 Tbsp
Fresh Thyme...1 Tbsp
Olive Oil...1Tbsp
These three (sage, rosemary, and thyme) are also referred to as a Poultry Mix. All measurements are considered a baseline; if you prefer a stronger flavor, you can increase the amount of herbs or reduce the amount for a milder flavor. If you cannot find fresh herbs and need to use dried herbs, you will need to reduce the baseline measurements by 1/2, as the dried herbs have a more concentrated flavor.
- Place butter on counter to soften
- Take the herbs (try to avoid including the stems) and chop them very fine or, if you have a food processor, place them in there and pulse until finely chopped.
- Next take your softened butter and place in your food processor
- Add a small amount of olive oil (1Tbls)
- If you do not have a food processor (like me), place butter and herbs in a bowl and mix with a mixer until well combined.
- Pulse until well combined
- Take plastic wrap and place on the counter
- empty butter onto the plastic wrap
- fold the wrap over the butter
- Using the edge of a cookie tray or other straight object, press it against the butter and tightly form into a log about 1-inch in diameter (the plastic wrap acts as a mold)
- careful not to get the plastic wrap under the butter, roll-up and twist both ends
- place butter in refrigerator
Crème Fraîche:
Things you'll need:
Heavy Cream...1 cup
Butter Milk...1 Tbsp
jar w/lid...1
- pour heavy cream into jar
- add buttermilk
- put lid on jar and let stand at room temperature for 24 hours, then refrigerate
- can be stored for up to a week
Any left-over Crème Fraîche can be used as a very rich sour cream.
17 November 2008
Thanksgiving Countdown
 As you are all aware, Thanksgiving is fast approaching. As many of us will be traveling to be with our families, there will be some who must stay behind and act as host: I am one of these people. Yes, my wife and I will be hosting Thanksgiving for the 11th year. I am estimating that around 20 of her family (all of my family is hundreds of miles away) will be descending upon our humble home and for the next 8 hours, chaos will reign supreme.
Now, I am not saying that I dislike hosting Thanksgiving, in fact I enjoy it. I look upon it as a challenge in logistics and a test of my cooking skills. The only part I have a problem with is when people start to come into MY kitchen and get in the way. Other than that, I actually have fun. My responsibility is the turkey, whipped potatoes, one side dish (I try to come up with a new side dish to try each year and this year it is going to be a spinach and artichoke casserole), and two pies. I say my responsibility, because I want my wife to be able to spend as much time with her family as possible, so I do all the cooking and baking (except for one pie that my wife bakes).
Why am I telling you all this, besides having the opportunity to post a new article? Well, over the next several days, I will be sharing some of the recipes I will be using and I'll also tell you how I go about preparing the guest of honor...the turkey. Now, to start things off, let me give you my actual Thanksgiving Shopping List (as of this writing) for this year...
Turkey
Potatoes...10 lbs.
Granny Smith Apples...2.5 lbs.
Pumpkin...
Jellied Cranberries...2 cans
Olives...2 cans
Stuffing Mix...3 boxes
Vegetable Broth...3 boxes
Cream Cheese
Heavy Cream
Buttermilk
Smoked Gouda...1 lb
Fresh Parsley
Grated Parmesan
Brie...1 lb.
day-old French bread...1 loaf
Chicken Stock
Lemon Juice
Artichoke Hearts...3 (8 1/2-ounce) cans
Extra-Virgin Olive Oil
Spinach...2 1/2 pounds
Yellow Onions
Garlic...1 bulb
Dry White Wine...1/4 cup (optional)
Oranges...2-3
Celery
Carrots
Lime Juice
Brandy
16 November 2008
Thank You to My Advertisers: 11/9-11/15
As of November 2009, I will no longer be with Entrecard, so in order to free-up valuable file space, I have removed the images and contents from this page. I apologize for any inconvenience this may cause. However, I invite you to stop by my main page and see if there is anything of interest to you...
Everyday Living
Everyday Living
13 November 2008


11 November 2008
My Mind Is in The Gutter
 I spent a few hours on Saturday playing in the mud and getting wet. Was I gardening? No, I was cleaning the gutters around our house. It had been 9 years since they had been cleaned (Okay, we moved into the house 9 years ago), and I figured it was time for them to have a bath. Naturally, I had to pick a cold, misty day to do this. (I have yet to do anything outside this Fall on a nice day. Those usually come the next day). Anyway, I saw a bunch of eaves sticking out from above the edge of the gutter and I figured they should be cleaned.
Okay, 15-20 minutes tops to scoop-out the leaves and then back to my football game. You see, it was halftime and I wanted to get back in time to see the rest of the game. Two and a half hours later, I come back into the house wet and muddy. What started as a home improvement activity to keep me away from the refrigerator for 30 minutes, turned out to be a major undertaking that kept me from seeing the end of my football game. Here's what happened...
I grab the ladder and the trash bag-lined pail and climb up to grab my first handful of leaves. What I got was a handful of leaves and sludge. Yup, the entire 16-foot length of the gutter was coated with a 1/4"-1/2" layer of sludge. So, starting from the end nearest the downspout I began to scoop the sludge and leaves, slowly working my way down to the other end. Once completed and to make sure that everything was sparkly and shiny, I grabbed the hose and washed down the gutter and then sprayed the water down the downspout to unclog anything that may have been stuck there. I then did the same thing to the two other gutters that surround our abode. Sure enough, they each had a layer of mud or sludge coating the bottom.
The moral of this story is: you may have more than leaves in your gutters. The layer of sludge not only slows down the flow of water to the downspout, but it also adds an enormous amount of weight to the gutter. Please be sure and check your gutters and make sure that you have a clean and unrestricted flow of water to and through your downspout (make sure that the water drains away from your foundation). An overflowing gutter can create a source of ice dams (in colder climates) and can contribute to, among other things, leaky roofs and rotting wood.
Oh, I missed the rest of the game, but my team won!
10 November 2008
When Scales Fly
 Today I had my annual physical. I was very apprehensive about what my weight would be, since the scale I am using is a piece of...Anyway, I step on the scale and am told that I weigh 236.4 pounds. I took a look at my chart and they had me at a starting weight of 298. The scale that I am using at home had me at 276. So, I have lost about 15 more pounds than I thought. That's it! My scale may not be accurate any more, but it will still fly nicely out the window! The point of this wordiness is to say that the doctor came in and congratulated me on losing 62 pounds of fat since last August.
So, I come home and celebrate with a huge cheese pizza from Chicago Connection (you don't need to ask for extra cheese on these babies). No, I was good and made spaghetti (using the sauce I made a few weeks ago) for my family and I stuck with my usual frozen dinner; 240 calories of pure bleah. Actually, it's not that bad, I would just like to break down and have some real food sometimes.
Well, it's time for me to go, I need to teach myself how to do Time, Rate, and Distance calculations. I have no problem teaching and doing the actual equations, it is setting-up the equations (from the word problems) that I am having problems with. Have a great day and wish me luck as I delve into the wild world of Algebra.
09 November 2008
Thank You to My Advertisers: 11/2-11/8
As of November 2009, I will no longer be with Entrecard, so in order to free-up valuable file space, I have removed the images and contents from this page. I apologize for any inconvenience this may cause. However, I invite you to stop by my main page and see if there is anything of interest to you...
Everyday Living
Everyday Living
08 November 2008
How to Make Crème Fraîche
Crème Fraîche:
Things you'll need:
Heavy Cream...1 cup
Butter Milk...1 Tbsp
jar w/lid...1
Putting it together:
Any left-over Crème Fraîche can be used as a very rich sour cream.
Things you'll need:
Heavy Cream...1 cup
Butter Milk...1 Tbsp
jar w/lid...1
Putting it together:
- pour heavy cream into jar
- add buttermilk
- put lid on jar, shake to combine, and let stand at room temperature for 24 hours, then refrigerate
- can be stored for up to a week
Any left-over Crème Fraîche can be used as a very rich sour cream.
06 November 2008
Fotos for Friday 11/7
Have a happy Friday and a great weekend. Enjoy...

courtesy of... funnyhub.com

courtesy of... badcontrol.com

courtesy of... funnyhub.com

courtesy of... funnyhub.com

courtesy of... badcontrol.com

courtesy of... funnyhub.com
05 November 2008
The Leaves of Autumn
 Yesterday, I decided not to workout, but guilt finally got the better of me so, I decided to rake the leaves in our backyard. I feel that if I don't exercise every day, I start to feel guilty. I have the strange mindset that I have to EARN the calories I ingest. Weird, isn't it? Anyway, I had been meaning to do this for some time, but I wanted to wait until a majority of the leaves had fallen off the trees. Of course, there is always that ONE tree that has to wait for the last minute and then drop all its leaves overnight.
Finally, a few days ago the tree lost its leaves and I was ready to venture out and conquer the yard. There were so many leaves on the ground, that you could not see any of the grass. With rake in hand, I ventured out and started to rake. Naturally, the day I pick to do this has to be cold and windy. The temperature was around 48 degrees and the windchill knocked that down into the 30's. Just over an hour and six, large yard bags later, I was finished. I felt that I really had a great workout and I was able to complete a chore that needed to be done. Basically, I felt that I killed two birds with one stone. I went inside to get warm and rewarded myself with a hot cup of coffee.
Today, I woke up and I could barely move. Every muscle in my body was sore. When I do my strength training, I am in the habit of doing very intense workouts. I am used to having sore muscles, but never anything like this. I can only imagine that I was working my muscles and not even realizing that I was doing so. My point: even doing routine yard work is a great source of exercise. So, if you get bored with your routine and you have a yard full of leaves (or any other outside chores), go ahead and skip your routine and hit the outside world. Not only will you get a much-needed chore accomplished, but you will get a good workout as well.
04 November 2008
Of Mice and Men
 We were all sitting in the living room and watching television last week and Koko was doing his usual "patty-cake" routine on my daughter, when he suddenly ran off her and went running over to the heating vent. Naturally, I was curious, so I went over and looked through the grate and saw a little tail and a small brown butt. Great, the mice have gotten into the ducts.
I knew that we had mice under our house, but I had no idea that they had chewed through the ducts. This means that I am going to have to go down there, find where they chewed the hole, and then tape it back up. In order to do this, I'm going to have to invest in a good work light (it's always nice to see what I'm doing) and try to put a curb on my claustrophobia.
Luckily, it seems that they have only gotten into the duct that leads to the living room. Now, after I get the duct sealed, I will still be left with mouse problem. Here's the big question: short of a very expensive call to the exterminators, does anyone know how to get rid of mice?
03 November 2008
Thank You to My Advertisiers: 10/26-11/1
As of November 2009, I will no longer be with Entrecard, so in order to free-up valuable file space, I have removed the images and contents from this page. I apologize for any inconvenience this may cause. However, I invite you to stop by my main page and see if there is anything of interest to you...
Everyday Living
Everyday Living
02 November 2008
My October Top Droppers
As of November 2009, I will no longer be with Entrecard, so in order to free-up valuable file space, I have removed the images and contents from this page. I apologize for any inconvenience this may cause. However, I invite you to stop by my main page and see if there is anything of interest to you...
Everyday Living
Everyday Living
01 November 2008


FoodSavers
FoodSaver V3835 Vacuum Food Sealer with SmartSeal Technology


Product Features
* Automatic vacuum-packaging system with SmartSeal technology keeps food fresh longer
* 2 vacuum speeds; 2 seal levels; pulse function; canister mode; marinade mode for marinating in minutes
* Space-saving upright design; LED meter progress lights; auto liquid detection; built-in bag-roll storage
* Includes 11-inch roll, 3 quart-size bags, 2 gallon-size bags
* Measures approximately 5 by 16 by 10 inches
FoodSaver V2440 Advanced Design
Vacuum-Packaging System


Product Features
* Home vacuum-packaging system vacuums, seals, and shuts off automatically with a single touch
* Variable speeds; food-specific settings; CrushFree Instant Seal; sealing strip with nonstick coating
* Full-sized vacuum channel catches overflow liquids and fits any size FoodSaver bag; indicator lights
* Dishwasher-safe antibacterial drip tray, bag material, accessory hose, and instructions included
* Measures 16-3/4 by 9-3/4 by 4-1/2 inches
FoodSaver bags... FoodSaver Roll Bag Material
FoodSaver Jar Sealers... FoodSaver Jar Sealers
FoodSaver Containers... FoodSaver Containers
Product Features
* Automatic vacuum-packaging system with SmartSeal technology keeps food fresh longer
* 2 vacuum speeds; 2 seal levels; pulse function; canister mode; marinade mode for marinating in minutes
* Space-saving upright design; LED meter progress lights; auto liquid detection; built-in bag-roll storage
* Includes 11-inch roll, 3 quart-size bags, 2 gallon-size bags
* Measures approximately 5 by 16 by 10 inches
FoodSaver V2440 Advanced Design
Vacuum-Packaging System
Product Features
* Home vacuum-packaging system vacuums, seals, and shuts off automatically with a single touch
* Variable speeds; food-specific settings; CrushFree Instant Seal; sealing strip with nonstick coating
* Full-sized vacuum channel catches overflow liquids and fits any size FoodSaver bag; indicator lights
* Dishwasher-safe antibacterial drip tray, bag material, accessory hose, and instructions included
* Measures 16-3/4 by 9-3/4 by 4-1/2 inches
FoodSaver bags... FoodSaver Roll Bag Material
FoodSaver Jar Sealers... FoodSaver Jar Sealers
FoodSaver Containers... FoodSaver Containers
Slow-Cookers and Crock-Pots


Product Features
Color: Gloss Cinnamon
* 400-watt 7-quart slow cooker with electronic temperature sensor
* 10-hour programmable timer; auto, high, low/simmer, buffet, and keep warm
* Ob-round ceramic cooking pot offers flared rim and interior quart markings
* Glass lid designed with silicone soft seal; large stay-cool handles
* Measures 14-1/2 by 19 by 9-4/5 inches; 1-year hassle-free replacement warranty
* Also available in onyx black and stainless steel
KitchenAid 7-quart Slow Cooker


Product Features
* 6-quart slow cooker for sauteing, cooking, serving, and storing
* Use oval stoneware in heating base, on the stove, or in the oven
* Programmable countdown technology; digital timer; auto keep warm
* Stay-cool handles; dishwasher-safe stoneware pot and lid
* Measures 18 by 11-2/7 by 14-2/5 inches; 1-year warranty
Rival SCVI600B-SS Crock-Pot 6-Quart
Premium VersaWare Slow Cooker


Product Features
* Oblong-shaped slow cooker with adjustable temperature control
* 5-quart capacity; oven-, range-top-, and freezer-safe cooking pot
* Heating base conveniently doubles as a nonstick mini griddle
* Glass lid and insulated tote included; dishwasher-safe parts
* Measures 7-1/4 by 12-3/4 by 8-3/4 inches; 1-year limited warranty
West Bend 84915 5-Quart
Oblong-Shaped Slow Cooker with Tote


Product Features
* Versatile 3-in-1 slow cooker with stainless-steel electric base
* 3 heat settings; 3 stoneware vessel sizes--2 quart, 4 quart, and 6 quart
* Glass lid fits all 3 vessels; dishwasher-safe crockery and lid
* Cooking vessels nest into base for easy, compact storage
* Measures approximately 15 by 9 by 15 inches; 1-year warranty
Hamilton Beach 33135 3-in-1 Slow Cooker
with 2-, 4-, and 6-Quart Crocks, Stainless Steel
Subscribe to:
Posts (Atom)

