Firstly, here is the link to the Rich Snippets Testing Tool. Just click on the link and enter your URL to see how your site appears.
Second, after you have connected your blog to Google +, if you have been having any difficulties with trying to verify your blog authorship, your author profile photo does not show, one of your commenter's photos shows instead, or if you have any Hcard errors, you might want to go to the following site, it helped me clear-up those problems.
First, save your existing template!! I cannot stress this enough. This way, if you do make a mistake, it is easily corrected. Better yet, why not make another blog to use for testing...a testing blog. If you choose this route....
- Once you create your testing blog, mark it as private (no one but you can see it), and then go to your main blog and open the template
- Click, "Expand Widgets"
- Then right click "Select All" and then "Copy"
- Go to your test blog's template
- Click, "Expand Widgets"
- Right click, "Select All
- Hit "Delete"
- Then, right click and "Paste"
- "Save Template"
- Open your template and hit "Expand Widgets"
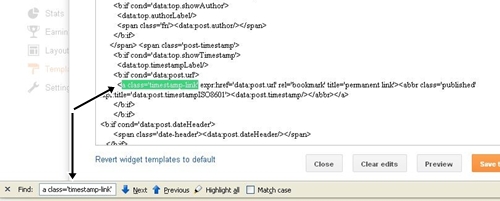
- Next, using Ctrl "F", you will open a small search window at the bottom of your screen
- In the "Find" window, copy/paste the following: a class='timestamp-link'
- Here is a screen shot of what it will look like.

- Here is a blown-up version of what you will be seeing...
<a class="timestamp-link" expr:href="data:post.url"
href="" rel="bookmark" title="permanent link"><abbr class="published"
expr:title="data:post.timestampISO8601"><data:post.timestamp/></abbr></a>You will notice the sections that I enlarged and are bolded. These are the two items that will be replaced with the word: Updated.
After you make the changes, your code should look like this: at regular size and not bolded...
<a class="updated" expr:href="data:post.url"
href="" rel="bookmark" title="permanent link"><abbr class="updated"
expr:title="data:post.timestampISO8601"><data:post.timestamp/></abbr></a>Next, press "Preview". This will allow you to preview your blog WITHOUT saving your template. If you happened to make an error, this is when you will know. If your blog comes up clean, then go back and hit "Save Template".
Finally, go back and test your blog again. The "Missing Required Field: Updated" error should be gone. I hope this helps.
So unfortunately this didn't work for me:( I have found another code where I basically add a date to each post, but that just seems annoying. I get another error about hcard "author". Any idea on that one?
ReplyDeleteDaniel J. Jones: I'm sorry this didn't work, but I have done a little looking around and I found a few sites you can visit and maybe they will be able to help you. This is the search parameters I used (Warning: Missing required hCard "author" error)
ReplyDeletehttp://august-blog.blogspot.com/2011/12/warning-missing-required-field-updated.html
http://www.technetsavvy.com/2012/03/fix-blogger-rich-snippets-warning.html
I found that when I was fixing this for my blog, I went through several different fixes until I found the one that worked for me. Also, I used a test blog to try out the various fixes before I used them on my main site. Please let me know how things turn out. If the above sites do not solve your problem, I'll try and look around and find something else. Good luck!