Showing posts with label social-networking. Show all posts

13 June 2012

Adding Pinterest Pin Buttons to your Images in Blogger

This is something I just came across today, so I figured I would share this with you. If you are a member of Pinterest, then you know about pinning images from other sites and about using the "Pin It" button on your web browser. But, what about being able to have other people "Pin" images from your site? Well, they can still use the "Pin It" button, but to make it even easier for them, why not place a button right below the image you want them to Pin?

Well, this is what I will try and explain today. First, you will need to login to your Pinterest account and then Click "Pin It Button" under the "about" tab on the upper right of your profile page. Scroll down until you get to the section titles, "Pin It Button for Web Sites." Also, you can just follow the link here to the Pinterest Goodie Page
Here's a screenshot of what you will see. Your URL areas will be blank, I just let you see what I was working on to give you an idea of what it will look like when complete...
Photo of Pinterest dashboard
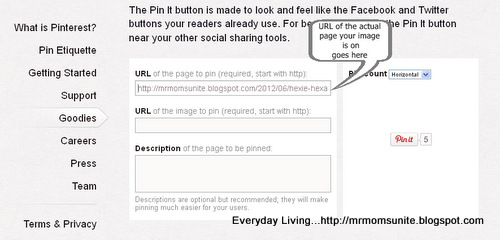
  • First, go to the actual page that your image appears and copy the url
  • At Pinterest, at the top of the section, you will see, "URL of the page the pin is on:". Paste the url here
photo of code for page url
  • In your Blogger editor, click on the HTML button and come down to where your image appears. Copy the URL address of that image
photo of location of HTML button

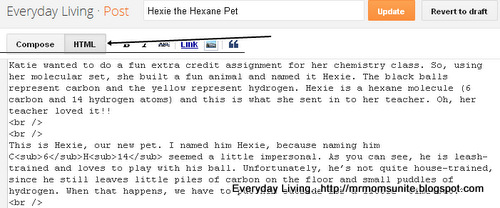
Here is what your image/photo URL will look like...
photo of location of HTML button
  • At Pinterest, come down to where it says, "URL of the image to be pinned:". Paste the image URL here
photo of image url
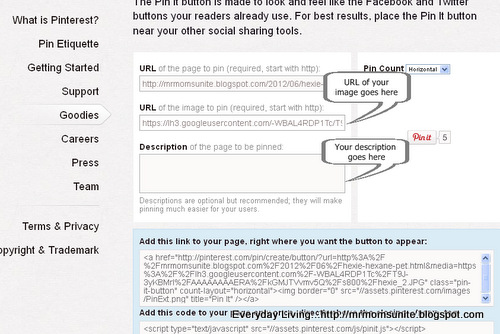
  • Provide a description of your photo. This is what will appear in the Pinterest "Pin It" window when it opens
photo of all codes
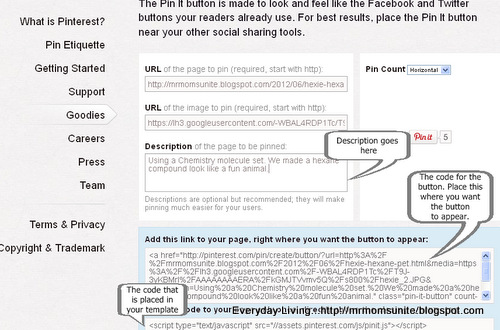
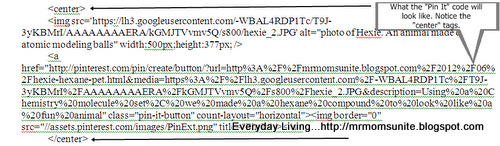
  • Find, "Add this code to your page, right where you want the button to appear:". While still in HTML mode, copy the code that appears and place it below your photo.
  • You might also want to be sure that you place the code before the closing CENTER tag, so it looks good
Here is what the code will look like when placed under your photo... photo of what code will look like when completed
  • Finally, at the bottom of the section, where you see "Add this code to your page only once, directly above the closing tag:" you will need to copy the javascript and place it in your template just above the tag
If you are unsure, I have included a few photos on how to get to your template. Also, be sure to SAVE your template before making any changes...

photo of button to click to get into template

second photo of getting into Blogger template


After you place the code and save, go back to your Blogger editor and click "Preview" to see that everything looks good.

16 July 2008

I've Dugg my Last Digg: Part-Two

picture of a lot of money behind a security glass in front of a buildingYes, traffic to my site increased dramatically, but it was not quality traffic. I was guilty of the same thing. I had so many Shouts to respond to, I found the only way to get through them would be to just click the button and move on. I had no time to read any of the articles. This is not how I envisioned Digg when I joined. When I start to dread opening my email, then something needs to be done.

So, you need to ask yourself what type of traffic you want to generate: Quality or Quantity? If you just want quantity, then by all means go to Digg and have at it. However, if you want to generate quality traffic, then avoid Digg and find other avenues. What are those other avenues? Well, you’ve heard them all before, but let’s go through them again.

First, write quality content; make people want to stick around and read what you spent so much time writing. Second, submit those article to online publishing sites such as SearchWarp, GoArticles, or eZine. Next, join some social networking sites such as BlogCatalog, MyBlogLog, MySpace, or FaceBook and become involved in the communities. Finally, join forums that are on subjects that interest you (most forums allow you to put your website address in your signature) and be sure to contribute worthwhile comments.

There are other ways, but my fingers are getting tired, so I’ll talk about them another time. Good luck in your adventures!

See also...

I've Dugg my Last Digg:Part-1

15 July 2008

I've Dugg my Last Digg: Part-One

picture of a cat laying across a keyboardWhen I first started with Digg a month ago, I was very optimistic about the results I would see. Before I continue, let me tell you a little about how Digg works. You submit a story and then you send a Shout (a notification) to all your friends. They then go to the site, read the article, and then vote for it. The more votes you get, the higher in the pages your submission climbs, thus the more people will see it. When someone sends you a Shout, you respond in kind. This is how it’s supposed to work.

I joined Digg and after a Digg exchange, I quickly got 119 friends. For the first week or so, things were fine, I received the Shouts and people responded to mine. Then, things started getting out of control. I would log into my email and be astonished to see 80 or more Shouts. I would eventually get through those and then find 20 new ones. It soon became overwhelming.

However, this was not the problem; the problem was that out of my 119 friends, only about 25 of them were actually responding to my Shouts. Here I am spending hours trying to be a good friend, only to find out that the vast majority of them are just deleting my Shouts. The other problem I found, was that the average length of visit to my site lasted less than 5 seconds, basically long enough to find the Digg button and click it.

Tomorrow: Part-Two

See also...

I've Dugg my Last Digg:Part-2
Related Posts Plugin for WordPress, Blogger...

Google Analytics