Showing posts with label tomatoes. Show all posts

20 September 2010

Tangy Salsa Recipe


photo of finished salsa


This recipe is for a large batch of tomatoes, if you have a much smaller harvest, you will need to halve or quarter this recipe. The addition of the vinegar, although added because I can this recipe, adds a tangy element to the fresh salsa. Even if you are making this to can, you really need to grab some nacho chips and try some fresh. It's awesome! Now, on to the recipe...

What you need...
  • 40-50 tomatoes (comes out to around 8 quarts)
  • 3 batches of green onions (12-15 individual plants. If you like a lot of green onions, add more. If you have any left over, you can always chop them up and add them to sour cream)
  • Approximately 36-40 ounces of roasted Chile peppers (the cans come in various sizes, so we get a 28 oz can and a 12 oz can. You can add more or less, depending on your preferences) (We use mild peppers, but you can use hotter ones if you wish)
  • 1 C. of white distilled vinegar (5% acidity)
  • 1 Tbsp. of pickling salt
What to do...

  • Core the tomatoes
    • Doing it now is much easier than doing it after you have removed the skins. If you are unsure of how to do this, I have provided a short guide for you... How to Core Tomatoes
  • Remove the skins from the tomatoes
    • If you are unsure of how to do this, I have provided a short guide for you... How to Peel Tomatoes
  • Cut the tomatoes into fourths and than eighths (you want to end-up with average-sized chunks)

    • Tip: You will notice that the cutting board is resting inside a baking dish. This is to contain the large amount of tomato juice that is released while cutting (I just dump this into the bowl with the salsa)
  • Place the chopped tomatoes in a Large bowl (We end up using two bowls)
  • Thinly slice the green onions and add to tomatoes
  • Dice the chilies and add to tomatoes
  • Add vinegar
  • Add salt
  • Mix well
  • Taste and adjust seasonings to your liking
If you are only interested in making a fresh salsa and plan to use this entire amount within a week or so, than you are done. The flavors will intensify over time. You can also do this step a day before the actual canning process; just keep the salsa covered and in the refrigerator.

If you plan to can the salsa, I will supply the instructions I use in my next article... Canning your Salsa

14 February 2010

Roasted Tomato and Garlic Soup

Last summer, we had several huge batches of tomatoes from our garden and when the first batch landed in the kitchen, I did what I normally do with our tomatoes: make a batch of salsa. Well, that first batch gave us twelve quarts and with the next harvest we gained an additional fourteen quarts. So, with the thought of yet another harvest coming and finding ourselves chin deep in salsa (yup, shameless plug), my wife and I decided that we should think about doing something else. Putting our heads together, we came up with a brilliant plan: what about soup?

With this new idea floating in the recesses of my empty brain, I decided that just plain tomato soup would be pretty boring, so to borrow a phrase from Emeril Lagasse, I decided to "kick it up a notch." The following is a recipe for Roasted Tomato and Garlic Soup. Now, I did not measure the amount of herbs or spices that I added; it was all done to taste. This means that you will need to taste your soup many times throughout the process, to get it to the way YOU want. The sugar is added to cut the acidity of the soup, so you will also need to adjust that to suit your taste. In this recipe, I used 60 tomatoes, but you can use any amount, just adjust the amount of the other veggies you use. Feel free to add your favorite vegetables and have fun. This recipe is a guideline to help you with the cooking and processing procedure. If this was a baking recipe, I would have given exact measurements, but cooking is more of an art, rather than a science. Have fun with it and make this recipe your own.


What you need...

Tomatoes (there's a shocker)... 60
Garlic... 3 bulbs (Yes, but we LOVE garlic!!)
Onions... 4-large
Carrots... 10
Bell peppers... 4
Tomato paste... 12 oz
Salt.. either Kosher or sea salt (for this amount of soup, I started with 1-Tablespoon and adjusted from there)
Pepper
Italian Seasoning
Basil
Bay Leaves (Turkish)... 3
Brown sugar
Olive oil
Large Stock pot
Blender
Potato Peeler
Food mill
Baking sheet
Foil
Mason jars w/ lids (for freezer storage)
Grilled cheese sandwich (to enjoy with your soup)
Lots of time


What to do...


  1. Set your oven to 425° and grab a baking sheet and line with foil

  2. Rinse your Tomatoes

  3. Peel onions and quarter

  4. Using a potato peeler, peel your carrots (this is an optional step, but I like to do it) and cut into sections

  5. Cut the tops off the peppers and cut then length-wise

  6. Remove the seeds and scrape smooth

  7. Take the bulbs of garlic and cut the top off

  8. Smear olive oil on the top

  9. Place garlic in foil and cover

  10. Place the whole tomatoes (the skin will be removed with the food mill at the end) and veggies on baking sheet and put into oven for about 35-40 minutes


    • Unwrap the garlic and using a fork, you can easily separate the garlic from the skin

  11. Once roasted, place veggies in stockpot and repeat until done


    • This part took me about four hours to complete

  12. Using potato masher, mash veggies as necessary

  13. Once all your vegetables are roasted and put in the stockpot, turn the stove to medium heat and add the Tomato paste, bay leaves (3), salt, pepper, Italian seasoning, and basil to the pot

  14. Bring to a boil then reduce heat and simmer for one hour

  15. Allow to cool partially

  16. Mash those veggies, again

  17. Taste and re-season, if necessary

  18. Using a ladle, place veggies into the blender

    • CAUTION...Only fill to halfway or a little less. The mixture is hot and when you turn the blender on, it will expand and try to fly out of the top

    • Place a towel over the lid of the blender (this will help prevent the soup from redecorating your kitchen)

  19. Pour blended mixture into a food mill and process

  20. Pour milled soup into a big bowl

  21. Repeat processing until done

  22. Taste soup and season with brown sugar to reduce acidity

  23. Place in mason jars

  24. Once cooled, transfer to freezer

  25. This recipe made ten quarts of soup


For Service...


  1. Thaw your soup and place in microwave-safe bowl

  2. Add a touch of cream or sour cream (what I add) to your soup and mix

  3. Heat and enjoy with a grilled cheese sandwich

02 September 2009

Canning Your Salsa

Photo of canned salsa


(I forgot to get a picture when they were on the kitchen counter and I am too lazy to drag them out again).


The following is the procedure I use to can my salsa. The processing time that I use is for an altitude of 2,700 feet. Processing times will vary depending on your altitude, so if you are unsure, please contact your local agricultural extension office for more information. Here is a chart to help you... MSU Extension Processing Guide


    What you need

  • Water canner

  • photo of a water canner
  • Mason jars w/seals and rings

  • Jar lifter

  • photo of a jar lifter

  • Your salsa, of course


    what to do

  1. Fill the canner with water and begin to boil

  2. Make sure to wash all your jars and lids

  3. Turn the oven on low and store your jars there (it will keep them warm)

  4. Fill small pot with water and add lids

  5. Put heat on low (you do not want to boil the water...just a low simmer)

  6. Get a big pot (8 quarts or larger) and add your salsa

  7. Heat to boil

  8. Boil for 20 minutes

  9. After 20 minutes, remove from heat and begin filling your jars

  10. Fill jars with salsa, but leave about 1/4-1/2 inch space from top

  11. Place lid on jar on get ring and tighten lid

  12. Repeat until all the salsa is in the jars

  13. Once the water in the canner is boiling, put your jars in and cover with lid

  14. Once water boils again, set timer for 55 minutes

  15. After 55 minutes, remove jars to cool

  16. Repeat procedures for any remaining salsa

  17. As the jars cool, you should hear the lids "pop" as they seal

  18. If you have any jars that do not seal, consider that jar "fresh" and use within a week or so
Photo of canned salsa

01 September 2009

My Salsa Recipe


bunch of tomatoes
Once again the tomatoes have invaded our home. From the time of only having one or two available to use, we now have 30-40 that are ripe and ready to go (what you see in the photo is less than half of the tomatoes we used). So, what to do with them all? Well today, I plan to make a few batches of salsa, but later harvests will be used for soup, tomato base, and just plain canning. This recipe is for a very large batch of tomatoes, if you have a much smaller harvest, you will need to halve or quarter this recipe. Now, on to the recipe...

    What you need...

  • 30-40 tomatoes (comes out to around 8 quarts)

  • 3 batches of green onions (12-15 individual plants)

  • Approximately 36-40 ounces of roasted Chile peppers (the cans come in various sizes, so we get a 28 oz can and a 12 oz can. You can add more or less, depending on your preferences) (We use mild peppers, but you can use hotter ones if you wish)

  • 1 cup of white distilled vinegar (5% acidity)

  • 1 tablespoon pickling salt


    What to do...

  1. Core the tomatoes


    • Doing it now is much easier than doing it after you have removed the skins. If you are unsure of how to do this, I have provided a short guide for you... How to Core Tomatoes

  2. Remove the skins from the tomatoes


    • If you are unsure of how to do this, I have provided a short guide for you... How to Peel Tomatoes


  3. Cut the tomatoes into fourths and than eighths (you want to end-up with average-sized chunks)

  4. tomatoes cut in fourths

    • Tip: You will notice that the cutting board is resting inside a baking dish. This is to contain the vast amount of tomato juice that is released while cutting

  5. Place chopped tomatoes in a Large bowl

  6. Thinly slice the green onions and add to tomatoes

  7. Dice the chilies and add to tomatoes

  8. Add vinegar

  9. Add salt

  10. Mix well

If you are only interested in making a fresh salsa and plan to use this entire amount within a week or so, than you are done. The flavors will intensify over time. You can also do this step a day before the actual canning process; just keep the salsa covered and in the refrigerator.

If you plan to can the salsa, I will supply the instructions I use in my next article... Canning your Salsa

29 August 2009

How to Peel Tomatoes


This is a necessary step in preparing tomatoes for canning or other type of processing.

  1. First, remove the cores on the tomatoes (doing it now is much easier than after removing the peel)

  2. Fill your sink with cold water

  3. In a large pot, bring water to a boil

  4. Once the water is boiling, place tomatoes in the pot and set your timer for 30 seconds

  5. When the timer goes off, remove the tomatoes from the boiling water and place in the sink filled with cold water

  6. The skins should come right off the tomatoes. Granted there may be one or two who want to be difficult, but just take a knife and scrape the skin off

  7. Repeat steps 4 & 5 until all tomatoes are peeled


Of possible interest... How to Core Tomatoes

How to Core Tomatoes

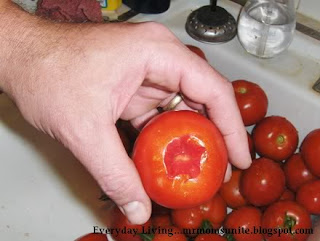
Although some may see this as an everyday thing and is a necessary skill in order to can tomatoes and skin them, there are many out there who have never done this before, so I will give a brief guide on how to core a tomato.

  1. Get a sharp knife and place it in your hand

  2. Rinse the tomato and put it in your other hand with the core (where the tomato came off the plant) facing up

  3. Take the knife and insert it approxiamtely 1/2 inch beside the core and about an inch deep

  4. Using your thumb as a guide, turn the tomato in you hand and move the knife in an up and down motion until you have completed the circle

Photo of coring tomato
    The top of the tomato should now twist off
photo of cored tomato

Of possible interest... How to peel tomatoes

08 October 2008

Hittin' the Sauce

photo of a kitten ruining a photo op.As I was checking my comments today, I noticed that several people (okay, 3) commented that they were wondering, "what about spaghetti sauce?" Well, I am here to tell you that spaghetti sauce is next on my hit-list.

We have between 40 and 50+ tomatoes that will be coming ripe by the weekend so, I have chosen Saturday as the day when I will make a huge batch of spaghetti sauce. You are probably asking yourself why you should care. However, this is the catch: I don't have any recipes that I want to use. When it comes to Alfredo Sauce, I have no problems and I can whip it up rather quickly. But when it comes to spaghetti sauce, I must say that I am stumped.

My last attempt did not go very well, mainly because the sauce came out tasting too acidic (yes, I should have added sugar) and the flavors were off. What I would like to do is ask any of you if you have any favorite recipes you would be willing to share. I plan on placing the sauce in quart-sized jars and freezing them. Since I am working on a scale which is larger then the usual recipe, just a list of ingredients would be fine and I can combine the ingredients to taste.

Also, I have noticed quite a few recipes which include hamburger and Italian sausage. Question: Since I am freezing the sauce, is it still alright to include the meat or should that be added at the time of service? Thanks for your help.

27 August 2008

Do the Salsa: Part-Three

photo of a scared kittenIf you decide that you wish to keep them for several months, then you will need to Can them and here’s how you do that…

Take the salsa and place in a large pot. Bring to a boil and cook for 20 minutes. Take the tongs and place your pre-washed and hot jar (I usually place the clean jars in the oven and turn the oven on low) next to the pot and, using the funnel, place the salsa in the jars leaving at least ½-inch space near the top. Place the lid on the jar (again, the lid being prepared according to the manufacturers directions) and set aside. Repeat until all the salsa in placed in the jars.

Once the water in the canning pot has come to a rolling boil, place the jars in the pot and replace the cover. Once the water comes to a boil again, then set your timer for 50 minutes. Buzz, Buzz… OK now remove the jars and repeat as necessary. When cooled, store in a dark, cool place. Hope you enjoy your salsa.

See also:
Do the Salsa:Part-1

Do the Salsa:Part-2

26 August 2008

Do the Salsa: Part-Two

photo of a cat with totally dilated eyesIf you decide to Can…

  • Mason Jars w/lids

  • Mason Jar Extractor (to retrieve the jars from the hot water bath

  • Canning Pot (to boil the canned salsa)

  • Tongs (to handle the hot jars)

  • Canning Funnel


First, take your lovely tomatoes and skin them. I know that is very cruel, but it is something that needs to be done. If you don’t know how to do this, than boil some water. When it comes to a boil, add your tomatoes and boil them for 30 seconds. Immediately take them out of the boiling water and place them in the sink (which you first filled with cold water). The skins should just come right off.

Next, cube the tomatoes and place them in a large bowl. You then need to finely slice the green onions and add on top of the tomatoes. Next, add the chilies, if they are not already sliced, then you will need to slice them. Finally, add the salt and vinegar and mix well. If you will be using all the salsa within a few days to a week, store in the refrigerator and enjoy.

Next Time: If you decide that you wish to keep them for several months...

See also...
Do the Salsa:Part-1

Do the Salsa:Part-3

25 August 2008

Do the Salsa

picture of a pouting cat sitting on a couchThis past week, our tomato plants just went wild and we ended-up with about 60 ripe tomatoes. Now, in addition to adding tomatoes to hamburgers, sandwiches, and creating my famous Tuna-Stuffed-Tomato, I had to find something to do with them all. Naturally, we shared some with the neighbors, but my wife had other ideas…Salsa.

Using her feminine wiles and various threats, she told me that she wanted me to make salsa. Well, given the fact that I misplaced the recipe I usually used (actually, it was bits and pieces from several recipes that I used), this was going to be a challenge. Thankfully, I remembered the main ingredients; I just forgot the proportions. Since it turned-out very well, if I do say so myself, I will bore you with the recipe. This will serve me in two ways: First, I will have something to post and Second, I will be able to find the recipe the next time I make it.

Stuff you will need:

  • Tomatoes (duh)

  • Green onions…4-5 bunches

  • Chilies, fire roasted…6- 6 oz. cans. We used mild, but if you like yours hotter, than get medium to hot, or mix and match.

  • Pickling Salt…1-1 ½ Tablespoons

  • White Wine Vinegar…1 cup


Next time: If you decide to Can…

See also...
Do the Salsa:Part-2

Do the Salsa:Part-3
Related Posts Plugin for WordPress, Blogger...

Google Analytics