Showing posts with label cooking. Show all posts

24 February 2019

Vegetarian Pasties


Since my wife likes veggies, I have taken a Pasty recipe and omitted the meat. So, for all you pasty purists out there, please forgive me for taking liberties with the recipe; and for those of you who are vegetarians, you can now have the same great taste, but without the meat. So, without further ado…

What you need:

Photo of pasty ingredients
Stuff you need

Pasty Crust
3 Cups Flour
1 ½ sticks of cold margarine, butter, or shortening (you choose)
1 tsp Salt
1 Pastry cutter
1 Cup Cold Water


Pasty Filling
1 Onion, diced
5 potatoes, diced
4-5 Carrots, diced
1-2 Turnips (1 large or 2 small), diced
1 tsp Salt
1 tsp Pepper


Putting it Together:
  • Take 3 cups of flour and add to a large bowl
  • Add 1 tsp of salt and mix into flour
Photo of flour with salt added
Flour with salt added
  • Take the margarine and cut it up into slices (about 6-8 slices. The number of slices does not matter. It just makes it easier to cut into the flour)
Photo of sliced butter
Sliced butter
  • Add a few of the slices into the flour and using the pastry cutter, cut into the flour until crumbly
Photo of butter in flour
Butter added to flour prior mixing
  • Add a few more slices of the margarine into the flour and repeat until all the margarine is added
  • Continue cutting margarine into the flour, until thoroughly incorporated
  • Take the cold water and add about ¼ cup to the dough and mix with fork
  • Continue to add water a little at a time until dough comes together and forms a ball
photo of completed dough
Completed dough ready to rest
  • Wrap dough in plastic wrap and put in refrigerator while you prep the veggies
  • Take the onion and dice into small pieces and add to a large bowl
  • Peel and dice the potatoes into small pieces and add to bowl
  • Peel and dice the carrots into small pieces and add to bowl
  • Peel and dice the turnip into small pieces and add to bowl
  • Add the salt and pepper to the veggies and toss with your hands to coat them.
Photo of diced and salted veggies
The diced and salted veggies
  • Take the dough and divide into 4 equal parts (for large pasties) or 6 equal parts for smaller ones
  • Roll each dough portion into a ball and set aside
  • Take 1 ball of dough and roll it out into a circle (think about it like making mini pie crusts)
  • Take 2/3 cup of the veggies and add to the middle of the dough
  • If there is room on the dough, you can add more
    • Just make sure that you have enough room to fold the dough and enclose the veggies
  • Add 1-2 tsp (does not need to be precise. This is just to add moisture to the pasty as it bakes) of margarine to the top of the veggies
  • Wet the edge of one side of the dough with water (the other half of the dough will be dry)
    • The water that you used to moisten one half of the pasty crust will act as a sealant to the other half and thus seal the entire pasty

photo of filled pasty
Filled pasty. Wet the bottom half of the dough and bring both
bottom and top together and crimp
  • Take both halves of the dough and join them at the top of the pasty and crimp to seal
  • Seal entire pasty in this manner
  • Place on baking sheet and pierce a few times with a knife (to vent)
  • Repeat with remaining pastries
photo of filled and folded pasties
Filled and folded pasties
  • Set oven to 425⁰
  • Bake for 45 - 50 Minutes or until pasties are golden brown
Photo of baked pasties
Fresh out of the oven

For any leftover veggies:
  • Place in an oven-safe bowl
  • Add a few dollops of margarine
  • Cover with foil
  • Bake in the oven

24 April 2017

Cabbage Soup


This soup is great for weight loss. My wife has been eating this for suppers for the past few months and she has lost over 20 pounds. It is a very filling soup and can also provide a "cleanse" to the digestive system (your results may vary). Even if you don't use this soup to lose weight, it is very good and makes a great comfort meal. This goes well with Naan Bread or a roll. You can also add crumbled sausage (which defeats the weight-loss portion), tofu, or any other type of veggie you may wish to add. Be warned, this recipe makes a HUGE portion, so you will need a large stockpot or two.  
photo of cabbage soup ingredients
Ingredients for Cabbage Soup
 What you need:


  • 1 Large head of cabbage (shredded) (or 2 small heads of different colors)
  • 8 Carrots (peeled and diced) 
  • 4 Onions (diced) 

18 April 2017

Slow Cooker Farina (Cream of Wheat)

This farina recipe will make anywhere between 5-10 servings, depending on how large a breakfast you like :)  Once cooked, you can place into portion-sized containers, take to work, and then heat in the microwave. Making this on the weekend can save you valuable time during the week.

Photo of ingredients for slow cooker farina
Ingredients for slow cooker farina

What You Need:
  • 2 Cups- farina
  • 1/2 Cup brown sugar or honey (cinnamon sugar is perfect just omit the 1-tsp of cinnamon) 
  • 1/2 Cup White sugar (if you think this might be too sweet for you, reduce to 1/4 cup) 
  • 1 can of pumpkin (optional)
  • 2-tsp pumpkin pie spice OR 
    • 1 tsp cinnamon
    • ½ tsp ginger
    • ¼ tsp cloves

10 April 2017

Vegetarian Slow Cooker Chili with Lentils and Quinoa

If you’re looking for a great tasting chili, but want to go sans meat, then this is the chili you need to try. While the chili is entirely vegetarian, you wouldn’t know it by tasting it.

This goes great with nacho chips, naan bread (Naan Bread recipe here), crackers, or just by itself. You can eat it heated or cold; makes no difference, as it tastes great either way. So, without further ado…

photo of the ingredients for the chili
Ingredients for chili
What you Need:
  • 1- Cup of lentils (rinsed)
  • ½ Cup of Quinoa (rinsed well)
  • 1- Onion (diced) (red for a sweeter taste or white for stronger taste)
  • 1- Bell pepper (any color, but I used red) 
  • 5- Carrots (peeled and diced. You can just slice them for a heartier texture) 

03 April 2017

How To Make Onion Salt

While it is very easy to just go to the store and buy your own onion salt, you might want to take a moment and see just how inexpensive and easy it is to make your own. If you have a pantry, there is a good chance that you already have sea salt and onion powder. If not, you can get them from the bulk bin at your local store. For example, at Winco, sea salt goes for around $0.24 per lb, while onion powder sells for about $3.64 per lb.

In the stores, you can purchase a 5.5 oz bottle of onion salt for around $2.93 or a 32 oz bottle for just over $12. By making your own, you can save around $1.50 for a 5.5 oz size or $8.00 for 32 oz. Oh, and by the way, you can also make garlic salt by following the same directions.


The only important part to remember, is to follow the ratio of 3:1: That is, 3 parts salt to 1 part onion powder. You can use any measuring device you wish, just keep to that 3:1 ratio and you'll be fine.


For example, let's say you just need to make a small amount; you can use a teaspoon for measurement. If you need a larger amount, you can use a 1/3 measuring cup (which is what I used when making this).


ingredients for making onion salt
Onion Salt Ingredients
What you Need:
  • Sea salt
  • Onion powder (or garlic powder if making garlic salt)
  • Measuring device (cup, tablespoon, teaspoon)


Putting it Together:
  • Take 3 parts salt and put in bowl
  • Take 1 part onion powder and put in bowl
  • Using a whisk to mix thoroughly
Photo of mixing the salt
Mixing the salt...assault with a whisk :)
  • Put into bottle


15 March 2017

Vegetarian Shepherd's Pie (with Vegan Substitutions)

I have to admit, that I'm used to making this pie with meat. However, since my wife can no longer have meat, I made the leap to the "other side" and made it using vegetables. Many recipes you find out there give the proportions for making just one pie, however, I feel if I'm going to go to the trouble of prepping all the veggies, I might as well make several pies instead of just one. The recipe that follows will make 3 (9-inch) pies; you can eat one now and then freeze the others for a later time. This recipe can also be easily converted to a Vegan recipe; I will provide the alternatives throughout. So, since you came here for a recipe and not a story on why I'm making it with vegetables, let's get on with the recipe.

photo of shepherd's pie
Interior of the pie
What you need:


For Potato Topping:
  • 1 bag of potatoes (10-pound bag. I used Russet potatoes) I told you, it will make more than one pie :)
  • 8 Oz's. low fat cream cheese
    • Vegan option:  Tofutti, Follow Your Heart (both made with soy), or GO Veggie!® (made with coconut oil and soy
  • 8 Oz's Buttermilk
    • Vegan option: You'll have to make your own... take 1 Tbsp of lemon juice or vinegar and add it to 1-cup of soy or almond milk; Stir and let it set for 5-10 minutes
  • 1/2 cup of butter or margarine (1 stick)
    • Vegan option: Earth Balance Buttery Sticks
  • 1 tsp salt to start. (Add more to taste)
  • 1/2 tsp pepper to start. (add more to taste)
  • Cheddar Cheese (optional)
    • Vegan option: Daiya Cheddar Style Shreds, GO Veggie!® Cheddar Cheese Alternative, and Follow Your Heart Vegan Cheddar Cheese

For Veggie Portion:
  • 2 Onions
  • 1 stalk of celery
  • 8 carrots
  • 4 cloves of garlic (or 1 tablespoon of minced)
  • 1 packet of mushrooms, about 8 Oz's (I used cremini)

07 October 2012

Green Giant Seasoned Steamers™ Giveaway


Contest is now closed.


Congratulations, Elis


I will be contacting you for your mailing information. I want to take this time to thank all of you who have participated and I hope that you will come back again for the next giveaway.


logo for Green GiantHow many times have you just finished preparing a delicious chicken breast or a juicy steak, but when you put it on the plate, you have nothing to go with it? Yes, it does look very lonely there all by itself; it needs some friends to keep it company! You could break out the pot and steam some veggies or you could roast some potatoes to go with it. But wait, there's an easier way. With a dash of imagination, a pinch of culinary skill, and a heap of flavor, Green Giant Seasoned Steamers™ are giving you a new reason to enjoy eating your vegetables. Shake up your vegetable routine with these flavorful, chef-inspired options that are seasoned to perfection, without a drop of sauce.

That's right, you can now enjoy your veggies without any added sauce. Can you think of a better way to brighten-up your meal, than to add some freshly steamed vegetables? As, as a added benefit, you don't have to worry about cleaning a bunch of pots and pans later, which sounds like a pretty good deal to me!

Available in six different varieties...

Green Giant Seasoned Steamers photo

  • Mediterranean Blend
  • Tuscan Seasoned Broccoli
  • Brussel Sprouts with Sea Salt and Cracked Pepper
  • Honey Roasted Sweet Corn
  • Honey Dijon Carrots
  • Backyard Grilled Potatoes


Green Giant Seasoned Steamers photo

Green Giant Seasoned Steamers™ are one of the first sauce-free seasoned vegetables to bring unique chef-inspired seasonings and premium cut vegetable blends to your dining room table.

If you want to try some today, here's a link so you can download a printable coupon for $1.00 off the purchase of one package of Green Giant Seasoned Steamers™...
Printable coupon


You can visit Green Giant at their website to get additional nutritional information and other info on your favorite products...Green Giant website

AND - during the month of October, there will be a “Love it, or your Money Back” offer available at GreenGiant.com


Now, for the Giveaway...

Green Giant Seasoned Steamers giveaway photo

You can now enter to win a...

Green Giant Seasoned Steamers Gift Pack 

You will get... 
  • (1) VIP coupon for one free package of Green Giant Seasoned Steamers™
  • Apron
  • Green Giant Serving Spoon
  • Mixing Bowl


Once again, I'm using the nifty Rafflecopter widget to make entering faster and easier...

Once the winner is chosen using the Rafflecopter random number generator, they will need to supply me with their mailing information. That information will be forwarded to MyBlogSpark, who will then send your prize.

This contest is open from now until 16 October 2012, 12:01 AM, Eastern Time. Open to US residents only.

Good Luck!
Legal stuff:I hereby attest and affirm I have received a gift pack from Green Giant®. I also disclose and reveal that the coupons, information, and gift packs have been provided by Green Giant® through MyBlogSpark

07 August 2012

How to Peel and Pit an Avocado

This tutorial will show you how to quickly peel and pit an avocado. I know that there are many out there who might be intimidated by the prospect of trying to peel and pit an avocado, but don't worry, it's very easy to do. There are a few tricks that I will share, that will make you a pro in no time. So, enough talking, let's get down to business...

What you need:

photo of avocado, knife, and spoon
  • Avocado... Now there's a shock :)
  • Knife
  • Spoon

Peeling and Pitting your Avocado...

  • With the avocado facing lengthwise, place the knife in the center of the avocado and cut into it until you hit the seed
photo of cutting the avocado
  • Continue your cut around the entire avocado. Basically, you are using the seed as a pivot point for your knife, rotate your knife around the entire avocado
  • Once the avocado is cut, take a half in each hand and twist in opposite directions
photo of twisting the avocado

photo of avocado cut in half, before the seed/pit is removed
  • Very carefully, so as not to cut yourself, take your knife and wack the seed. This will cause the knife to lodge itself in the avocado seed
photo of the knife lodged in the avocado seed/pit
  • With the seed firmly attached to the knife, twist the knife
  • The seed should come easily out of the avocado
photo of the knife twisting the seed/pit

photo of the seed/pit removed from the avocado
  • Take a rag and remove the seed from your knife. These seeds are VERY slippery, so using a rag will help keep you from cutting yourself and from chasing the seed around your kitchen floor
  • With avocado halves on the cutting board, take your knife and score the flesh in one direction and then in the opposite direction. Make sure you cut all the way to the skin
photo of slicing the avocado flesh

photo of slicing the avocado flesh
  • You want to end up with square cuts
  • Repeat with the other half
  • Take a spoon and scoop out the flesh
photo of slicing the avocado flesh

photo of peeled and pitted avocado
  • ...And you are done!!

05 June 2012

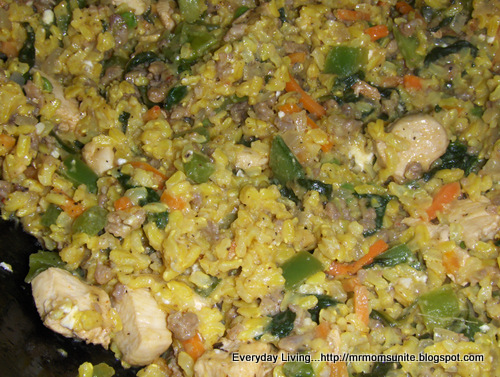
Ginger Chicken and Sausage with Brown Rice, Vegetables, and Spinach

Here's a great recipe to use if you are trying to find something healthy (especially if you omit the sausage) AND filling to eat for dinner. Please don't let the number of ingredients put you off, because although it does take a little over an hour to prepare, it is very easy to do. For just two people, this recipe will make meals for just over a week (depending on portion size). In other words, this recipe makes A LOT!!

Also, you can add just about anything to this recipe that you want. I have used pork instead of chicken and it tastes just as good. Feel free to experiment. This recipe is a great base from which to play around with different combinations of veggies and meats. Oh, it also goes great with Naan bread (an Indian bread). This is a flat bread, you can use it as a spoon to scoop the rice mixture. Very tasty!!

photo of chicken with sausage,brown rice, vegetables, and spinach

What you need:

04 June 2012

Naan Bread (Indian Flat Bread) Recipe

Here is a recipe for Naan bread that I found. I originally found this recipe at budgetbytes and I would encourage you to visit her site and take a look around. She has also broken-down the recipe and given a price list for each item, which is great if you're on a budget.


photo of Naan bread


There are many recipes out there for this bread, but this is the one that I have used several times, with great results. It is very easy to make and makes a great compliment to curry and rice dishes. It's also just fun to snack on :)


What you need:

  • 2 tsp. Yeast
  • ½ Cup warm water (about 110 degrees)
  • 2 ½- 3 Cups flour
  • 1 tsp. Sugar
  • ¼ Cup olive oil
  • 1/3 Cup plain Greek yogurt (if you don't have this, try using sour cream. Sour cream is not as "tangy" as the Greek yogurt, but it won't affect the overall taste.)
  • 1 large egg
  • ½ tsp. Salt
  • 1 Tbsp. Ground flax seed (optional) (high in fiber and has many health benefits)
  • Olive oil...for heating the bread (If not using cast iron pan)
  • Brown paper bag...for storage of bread

Putting it Together:

  • Set your bread machine to the "Mix Dough" setting and then add the sugar, water, and yeast. Let proof for about 5 minutes. It will be nice and foamy
  • Add 1 ½ cups of flour and then olive oil, salt, ground flax seed (optional), olive oil, yogurt, and the egg
  • Start the machine and add the remaining flour ½ cup at a time. Let the machine incorporate the flour before adding more. Once all flour is added, make sure the dough is not too wet or dry (add flour or extra water as needed)
  • Once the dough cycle is complete (about 1 hour 40 minutes), remove dough and gently roll into a ball
    • OR remove dough from machine after it is finished kneading- about 20 minutes- and place in a large, oiled, bowl. Cover with oiled plastic wrap and place in a warm area until doubled- about 1 hour), then remove dough and gently roll into a ball
  • Cut the ball into 8 equal parts and roll each of those into individual balls

Here's a photo of a few of the bread balls. They look bigger than they actually are..
photo of bread balls

  • Let rest for 10 minutes
  • Heat a large skillet (I used cast-iron) to medium heat
  • Working one at a time, take one dough ball and flatten it into roughly a 1/4" thick, 6" circle. If you're like me, your circles will leave much to be desired, so try and make a very thin polygon :). You will want to have lots of bubbles in your dough when you heat it, so the thinner the dough, the better
  • Add small amount of oil to skillet (if not using cast iron)
  • Add flattened dough and cook until bubbles form and bottom is brown (about 65 seconds). The first one will probably take longer to cook, but it's good to check at the 65 second mark. You are looking for the bubbles to be a golden brown. This means it is done

photo of Naan bread cooking

  • Flip bread and cook for an additional 65 seconds

photo of Naan bread cooking

  • Place cooked bread in brown paper bag and close top. this will help keep your bread moist
  • Repeat with remaining dough
Enjoy!

20 February 2012

Scrambled Eggs Casserole


photo of the scrambled eggs with bacon, sausage,spinach, and feta cheese

The following is a recipe I came up with to take a different spin on the usual scrambled eggs routine.It includes: scrambled eggs, bacon, sausage, spinach, and feta cheese. I originally came up with this to stuff into the calzones I like to make, but I have since found a variety of ways in which to use it. 
For example, you can:
  • Just eat it from your dish
  • Use it as a casserole (brunch idea)
  • Use it as a stuffing in burrito shells (brunch idea)
  • Use it as a pizza topping (my kid's favorite)
photo of the scrambled eggs with bacon, sausage,spinach, and feta cheese pizza
  • Make calzones (use your favorite pizza dough or make your own. Here's a link to my Pizza Dough Recipe)
  • Try it as a sandwich
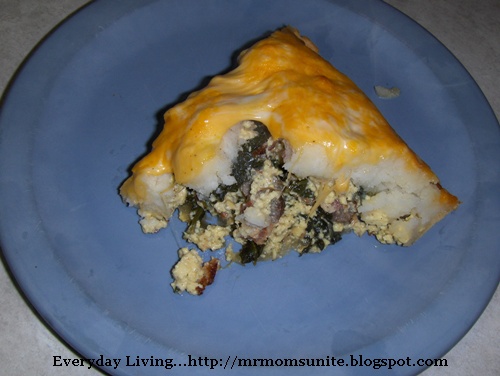
  • Use up pie crust by making it into a pie (I did this as well. I just topped it with mashed potatoes, cheese, and baked)
photo of the scrambled eggs with bacon, sausage,spinach, and feta cheese as a pie

photo of the scrambled eggs with bacon, sausage,spinach, and feta cheese as a pie

As you see, there are several things you can do with this recipe. Since this recipe makes so much, you can experiment with several ideas from just a single batch. Also, once made, this recipe keeps well for several days in the refrigerator. Just remove the portion you want and microwave to heat. Now, onto the recipe...


What you need:
  • 12 Eggs
  • 1 Cup buttermilk (adds a great tang flavor to the eggs)
  • Sausage...use your favorite
  • 6 Slices bacon (or more if you want)
  • 2 Handfuls of fresh baby spinach...(see photo below). You can also just use frozen spinach that has been thawed and drained. It will work just as well and you won't have to cook it :)
  • Feta Cheese...again, a few good handfuls (adjust to suit your taste)
  • Salt...to taste
  • Pepper...to taste
  • Rice wine vinegar...for spinach (Optional, but adds a great taste)
  • Minced garlic...for spinach (optional)
  • 6 Tbsp. Ranch Dressing (optional, but really adds a unique flavor).

Now that we have our ingredients, let's begin. What we will do is cook everything separately and then, once the eggs are cooked, we will combine all the elements together.

Bacon: 
  • Pre-heat oven to 400°
  • Place your bacon on a baking sheet (I line mine with foil, but parchment paper will work as well)
  • Bake your bacon for 10 minutes, turn and then bake an additional 10 minutes (this will give you fairly crispy bacon. If you like yours less crispy, just reduce the bake time
  • Remove and drain on paper towels, crumble, and set aside
Spinach: 
  • Place two generous handfuls of spinach in the frying pan and season with salt and pepper
photo of the spinach uncooked
  • Saute the spinach until cooked and then add some minced garlic (about a teaspoon) and rice wine vinegar
photo of the spinach cooked
  • Drain and set aside
photo of the spinach drained

Sausage:
  •  Place sausage in pan and cook until done
  • Drain and set aside
Eggs:
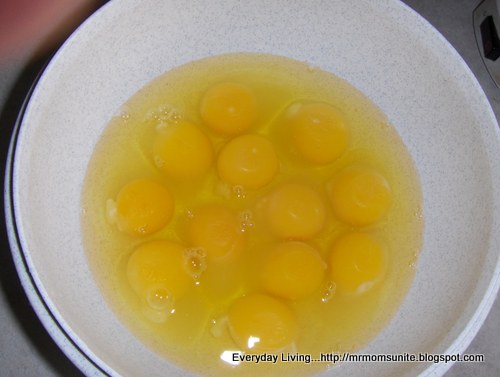
  • Place the eggs in a bowl and, using a whisk or fork, break the yolks and beat until smooth
photo of the eggs
  • Add the buttermilk (1 cup) and mix well
  • Add salt and pepper and mix well
photo of the eggs whisked
  • Add the eggs to frying pan and cook until scrambled to your preferred level of doneness (some people like their scrambled eggs well done and dry, while others prefer them more moist).
  • Drain any extra liquid if needed
Putting it together:
  • With the eggs still in the frying pan, add the spinach and combine well
  • Add the sausage, bacon, and mix well
  • Add the Feta cheese mix well and heat until cheese begins to soften
  • Lastly, add the Ranch dressing, if desired, and mix
photo of the scrambled eggs with bacon, sausage,spinach, and feta cheese
You now have a very versatile dish that can be enjoyed in a variety of different ways. Have fun and try and invent new ways of serving this. If you do, please leave me a comment and I will add your ideas to this article, along with a nice link to your site. :)

23 November 2010

Whipped Potatoes


Here's what they look like...

photo of whipped potatoes

This will be the last post on my Thanksgiving menu. I know, that in itself is reason to be thankful. There is the "Great Debate" as to whether to go mashed or whipped. If just making it for my family, I usually just do the mashed potato thing and save myself a little work. But, since this is a special occasion, I like to make things a little more fancy, which is why I choose to do the whipped potatoes. As you look over the ingredients to this recipe, you may raise your eyebrows when you come upon the buttermilk, but this will give your potatoes a nice, tangy flavor. As you can see, this recipe is somewhat large (I have to make enough for 23 people), but you can just scale-down the ingredients to suit your needs.

I hope you all have a very safe and Happy Thanksgiving!


What you will need...

  • Potatoes...10 pounds (1 bag)
  • Butter...½ to 1 stick
  • Salt...to taste
  • Pepper...to taste
  • Buttermilk...½-1 cup
  • Parmesan Cheese...1-2 cups (I know it's a lot, but I love to make it cheesy. You can also substitute the Parmesan for any type of cheese you like
    • measurements are estimates and based upon texture/taste

15 November 2010

My Thanksgiving Schedule and Crème Fraîche

Here is the second installment in my getting-ready-for-Thanksgiving posts. Here is a sample schedule that I will be using this year, which will help ease the stress (Yeah, right) of the Holiday:

  • Saturday... Cleaning the kitchen (the worst part of getting ready)

  • Sunday... Make the Crème Fraîche and compound butter

  • Monday... Complete cleaning the kitchen

  • Tuesday... Making the apple pie, pumpkin cheesecake, and the rolls

  • Wednesday... getting the Manicotti ready (will bake on Thanksgiving), get the turkey ready for it's starring role, and generally making sure everything is good to go

  • Thanksgiving... The madness begins

I use the Crème Fraîche (basically a very rich sour cream) in my apple pie (I will share this recipe in the next few days) and any leftovers you may have can be easily used as an additional garnish for your mashed/whipped potatoes. The recipe for the Crème Fraîche is very easy and takes very little preparation, however, it does take 24 hours for it set, so it is best to make the one or two days before you plan on making your apple pie. For example, I usually make the pie on Tuesday, so I will start the Crème Fraîche on Sunday night.

photo of Crème Fraîche
photo courtesy of... artistta.blogspot.com

Crème Fraîche:

Things you'll need:

Heavy Cream...1 cup
Butter Milk...1 Tbsp
jar w/lid...1

05 October 2010

Large Meat and Sausage Stuffed Zucchini

My wife's friend gave her two HUGE zucchinis last week and I needed to try and find something to do with them. Granted, I could have resorted to the old zucchini cookies and bread routine, which I did a few weeks ago, but I wanted to try something different. Also, I am just too lazy to stand still for hours grating those behemoths. So, I did a little searching and combined a few recipes into one. Even though the proportions in this recipe are for large zucchinis, you can easily adapt it for smaller ones. You can also use this stuffing for peppers, tomatoes, or anything else you can think of.

31 August 2010

Tofu Marinade

A few week ago, my wife was treated to a birthday lunch by some of her friends from work. They went to a Thai restaurant called Mai Thai, where she ordered a vegetarian dish that had fried tofu in it. Well, to make a long and boring story short, she brought some of it home and had me try it. Much to my horror, I liked it. Yes, you heard me correctly, it was really, really good. Now, I know that tofu acts like a sponge and absorbs anything that touches it, so if I was even to try to attempt to recreate the way it tasted, I would have to discover what they marinated it in. Although I have a ways to go to perfect the recipe, what follows is a favorite of my wife: served cubed with fried rice.

06 May 2010

Recipes

I have provided a short snippet for each post, so hopefully it give you an idea as to what the entire article is about. Just click on the link, to read the entire article.

Recipes...


Here are just a few of the recipes that I have posted. All have been tried by me.

Focaccia Bread Recipe

Now, if you do not have a sourdough starter and would like to make one, you can visit How to Make Sourdough Starter to get started. If you would just like to make the bread, but without using a sourdough starter, please visit Cinnamon Spice & Everything Nice at the above link and you can follow her recipe. While there, please take the time to view some of her other mouth-watering recipes.


French Fry Dip

As you may or may not know, I like to make our own home-made fries (yep, another shameless recipe link) and I can think of nothing better to go with those fries, than a good dip. With this in mind, I decided to experiment with a dip I found over at Super Mommy to the Rescue (by the way, I stole the photo from Super Mommy, because her picture turned out a lot better than mine). Well, to the great shock and disbelief of my wife, I actually kept track of what and how much I added, so I am able to share this recipe with you. Although, we used this batch for the fries, this dip can be easily paired with chips or any veggies of your choice.


Roasted Tomato and Garlic Soup

Last summer, we had several huge batches of tomatoes from our garden and when the first batch landed in the kitchen, I did what I normally do with our tomatoes: make a batch of salsa. Well, that first batch gave us twelve quarts and with the next harvest we gained an additional fourteen quarts. So, with the thought of yet another harvest coming and finding ourselves chin deep in salsa (yup, shameless plug), my wife and I decided that we should think about doing something else. Putting our heads together, we came up with a brilliant plan: what about soup?


Thanksgiving Day Turkey

The above photo is a pretty good representation of what our turkey will look like when completed. You would have thought that after doing this for so many years, I would have thought to at least take one picture of ours. Unfortunately, whenever I do think about it, it's too late. Anyway, this is how I've been preparing our turkey for the past several years. It comes out very moist (thanks to the turkey bag) and the aromatics really give the turkey an added boost.
As an aside, even though it has never happened, I always have the fear that our turkey will turn out like the one an Christmas Vacation. Anyone else have this fear?


Salsa Recipe

Once again the tomatoes have invaded our home. From the time of only having one or two available to use, we now have 30-40 that are ripe and ready to go (what you see in the photo is less than half of the tomatoes we used). So, what to do with them all? Well today, I plan to make a few batches of salsa, but later harvests will be used for soup, tomato base, and just plain canning. This recipe is for a very large batch of tomatoes, if you have a much smaller harvest, you will need to halve or quarter this recipe. Now, on to the recipe...


How to Make Sourdough Bread Starter

Being that the cost of a loaf of sourdough bread is roughly $4.00, I decided that since we are trying to save money, why not try and make my own sourdough bread. So, with this thought echoing in my mind, I went on a journey to discover what I would need to do. I have made regular bread before, but I have never even attempted sourdough, basically because with terms like starter and sponge...it seems a little intimidating. However, as you will see, it is pretty easy.

Making a Biga


Making Italian Bread


Making Tangy Potato Salad

My wife and her family are having a get-together this weekend, so I once again had to open my big mouth and volunteer to make something. So, now I am now stuck with making potato salads for my wife and her family. Since I must now make not one, but two salads (again, the big mouth comes into play), I decided to give you the recipes so you can try them as well. The one today is the recipe I recreated from my grandmother's salad. I plan to begin this recipe on Thursday, which will allow the flavors in the salad to really become pronounced. As you will see, this makes a large amount of potato salad.


Apple Pie with Crème Fraîche and Black Pepper

Okay, I know it's strange posting the deserts first, but I like to make them a few days in advance. This way, they are not only done and out of the way, but it also allows the flavors to blend together longer. It may seem strange to use Crème Fraîche (a rich sour cream) and black pepper in an apple pie, but one taste of this pie and you may be hooked.

02 May 2010

Taco Hamburgers

Okay, what do you do when you cook-up a batch of taco meat and have no taco shells? Well, besides NOT making a batch of taco meat (Yes, a shameless plug. Just scroll down a bit for the taco mix recipe), which would be the best thing, you can always improvise. In addition to not having any taco shells, we didn't have any hamburger buns (violins play in the background), so I really had to come up with an idea of what to do. The first thing that popped into my mind was to just use some bread, but if any of you have ever tried to make loose meat sandwiches or sloppy joe's using regular bread, you know what a mess that can make. The bread just absorbs all the juices and you're left with a soggy, but good, mess.

20 February 2010

My First Pizza

photo of two homemade pizzas
Several weeks ago I made a new sourdough starter that I want to use for pizza dough. Well, last week, I decided to give it a test run and see how it tasted. Even though we didn't have the ingredients available for the type of pizza I wanted to make; even though we don't have a pizza stone; even though we don't have a pizza peel (fancy name for a spatula on steroids), my impatience won the battle and I went ahead and made one anyway.

As you can see from the picture, I won't have to worry about Domino's begging me to come work for them any time soon, but even though it looks like an extra from the 1950's classic The Blob, I'm told it still tasted good. Now, since this was the first time I used this starter, there was not going to be a lot of extra dough to play with, so I went ahead and made two smaller ones. The one on the right was for my daughters and the one on the left was for my wife.

My daughters' pizza was just a simple cheese pizza. I took their crust and brushed it with olive oil and then layered-on the cheese. For my wife's pizza, I went to the freezer and defrosted some of the tomato sauce I made last year and spooned that on the crust. I then took some vegetarian sausage that she got (we had a free coupon for it) and put that on the pizza. Then a slice of American cheese torn-up and placed around the top. Any exposed crust was then brushed with olive oil.

These little beauties were then covered and stored in the refrigerator until about one hour before cooking time. At cooking time, I set the oven to 450° and cooked them about 15 minutes. I then served the pizza and went into the next room and did our taxes (fun times, huh?). Anyway, when I came out an hour later, I expected to find leftover crusts, because my daughters NEVER eat the crust; they always pawn them off on my wife, but this time they ate them...go figure.

Taking another quick look at the picture, you can see that I need to do a lot of work on my dough rolling and shaping, but I guess that will come with practice...and I intend to practice a lot.

02 January 2010

How to Boil an Egg

While watching television last night, I saw a commercial for a hard boiled egg cooker. I couldn't believe that someone would actually need to but something like that. Yes, you can use it to steam veggies, but can't you just use a strainer and a pot of water to accomplish the same thing? Anyway, in my constant pursuit to find just about anything to write about and to save you $19.95, I have decided to share the procedure I use to hard boil eggs. I realize that this may seem like a very basic skill, but I also know that there are many out there that may not know how to do this. So, without further delay, here it is...

I am using large grade AA eggs. If you use smaller eggs, your time may vary.

What to do...

  1. Get a pin and pierce the eggshell at the flat-end. There is a small air sack located here and by making a small pinhole here, you will help minimize the possibility of your egg cracking during the boiling (this is an optional step)
  2. Place your eggs in the bottom of a pan
  3. Add enough cold water to cover the eggs
  4. Add a pinch of salt
  5. Place lid on the pan, but allow the steam to escape
  6. Place pan on the stove and turn to high
  7. When the water starts to boil, set your timer for eight minutes
  8. Let boil
    • For a soft-boiled egg it was suggested by one of my commentors to just leave them for three to four minutes
  9. After ten minutes, remove from heat and pour-out the water
  10. Add cold water to the eggs and then pour out
  11. Repeat three to four times
    • This procedure stops the cooking process
  12. Add cold water or ice and allow to set until the eggs are cool
  13. You should end up with a hard boiled egg with a nice orange yolk. Now, if you like to have a yellow yolk with that wonderful green ring around it, increase the time by two to three minutes


Peeling the little guys...

  1. Crack your egg from top to bottom
  2. Under cold water, rub the egg between your hands. This will help loosen the membrane that is between the shell and the egg and make the shell come off much easier
  3. Peel your egg

24 November 2009

Your Guide to Lump-Free Gravy


This is the last in my series of Thanksgiving Day posts, so I hope the previous articles have given you some new ideas to try. The following gravy is flavored with the dripping from your turkey and is not made from the giblets. I hope you all have a terrific Thanksgiving.


What you will need...

Turkey drippings
Flour
Butter...unsalted, please
Cardamom...To taste
Salt or 1-Chicken Bouillon Cube (crushed)...To taste
Pepper...To taste
For adding the flour and the butter (making the roux), I use a 1:1:1 ratio...1 Tbsp of butter to 1 Tbsp of flour to 1 Cup of liquid. I will be writing this recipe to accommodate 3 Cups of turkey drippings...


Putting it together...

  • Try and separate the fat from the turkey drippings
  • In a sauce pan over medium heat, melt 3 Tbsp butter
  • Once melted, add 3 Tbsp of flour and whisk to combine
    • Now is decision time. How dark do you want your gravy, because the longer you stay at this step, the darker your gravy will be. I like my gravy to be somewhat lighter, so I will whisk over medium heat for about 5 minutes. If you want your gravy darker, keep whisking. For a very dark gravy, as in a gumbo, you will be at this step for about twenty minutes
  • Once you reach your desired color, slowly add the 3 cups of turkey drippings; whisking constantly
  • add salt or crushed bouillon, pepper, and cardamom (cardamom has a rather strong flavor, so I like to start with this small amount and continue adding until I reach the desired flavor...start with a ½ tsp
  • Continue adding the pepper and cardamom, until you are happy with the flavor.
  • Continue whisking until the gravy boils (This is when it will reach its full thickening potential)
  • You should end up with a very tasty, lump-free gravy
  • If you need to delay service, take some plastic wrap and set it directly on top of the gravy. This will help prevent that wonderful "skin" from forming


Troubleshooting...

Gravy seems to be "missing something"...I usually crush a chicken bouillon cube and add it to the gravy. This seems to correct the problem. If not, try adding some chicken stock or experiment with a little crushed sage or a very tiny amount of mace. If the gravy has too strong of a turkey flavor, you might want to dilute it with water or, if you don't mind a white gravy, add milk or cream.

Gravy is not thick enough...In a separate bowl, spoon-in about a half cup of your gravy and whisk an additional Tbsp of flour. Once well incorporated and no lumps visible, add it back into the main gravy and whisk well. Bring to a boil. If this does not thicken it to your liking, grab a bowl and place a tablespoon of flour in it. Then, take some of your hot gravy and mix it with the flour (if you add the flour directly into your gravy, you will get lumps, so we take this extra step). Once the flour is fully incorporated, mix it in with your gravy. Repeat until you get the your desired consistency.


Something else you might want to try...

  • Replace the cardamom with a spice called Grains of Paradise


Originally published as...My Thanksgiving Gravy
Related Posts Plugin for WordPress, Blogger...

Google Analytics