Showing posts with label baking. Show all posts

02 February 2016

Sour Dough French Bread


photo of sour dough french bread


I made some French bread today, but instead of just using the active sour dough starter, I added yeast as well.  It came out pretty good, with the added bonus of a much shorter rise time of 2 hours instead of 6.

What you need:
  • 1 cup of active sour dough starter
  • 2 1/2 tsp yeast
  • 1/2 cup of warm water
  • 1 tsp salt
  • 2 tsp sugar
  • 1 egg
  • 2-3 cups of flour (you may need more or less depending on humidity)
Putting it together:
  • In a bowl, add the sour dough starter
  • Add 1/2 cup of flour and mix until combined
  • Allow to sit for about 30 minutes
  • Put yeast and sugar in small bowl and add water
  • Once yeast has bloomed, add to sour dough starter
  • Mix to combine
  • Add salt and egg, mixing to combine
  • Begin adding flour 1/2 cup at a time
  • Continue adding until well mixed. Dough should be somewhat sticky, but not TOO sticky.
  • Once kneading is complete, cover and let rise until doubled in size: 60-90 minutes.
  • After first rise, take out, punch down gently, and shape into loaf(s)
  • Cover and let rise an additional 30 minutes
  • Preheat oven to 425
  • Bake for 18 minutes, or until the internal temperature reaches 200 degrees
  • Remove and let cool at least 30 minutes before slicing
  • Enjoy!!

04 June 2012

Naan Bread (Indian Flat Bread) Recipe

Here is a recipe for Naan bread that I found. I originally found this recipe at budgetbytes and I would encourage you to visit her site and take a look around. She has also broken-down the recipe and given a price list for each item, which is great if you're on a budget.


photo of Naan bread


There are many recipes out there for this bread, but this is the one that I have used several times, with great results. It is very easy to make and makes a great compliment to curry and rice dishes. It's also just fun to snack on :)


What you need:

  • 2 tsp. Yeast
  • ½ Cup warm water (about 110 degrees)
  • 2 ½- 3 Cups flour
  • 1 tsp. Sugar
  • ¼ Cup olive oil
  • 1/3 Cup plain Greek yogurt (if you don't have this, try using sour cream. Sour cream is not as "tangy" as the Greek yogurt, but it won't affect the overall taste.)
  • 1 large egg
  • ½ tsp. Salt
  • 1 Tbsp. Ground flax seed (optional) (high in fiber and has many health benefits)
  • Olive oil...for heating the bread (If not using cast iron pan)
  • Brown paper bag...for storage of bread

Putting it Together:

  • Set your bread machine to the "Mix Dough" setting and then add the sugar, water, and yeast. Let proof for about 5 minutes. It will be nice and foamy
  • Add 1 ½ cups of flour and then olive oil, salt, ground flax seed (optional), olive oil, yogurt, and the egg
  • Start the machine and add the remaining flour ½ cup at a time. Let the machine incorporate the flour before adding more. Once all flour is added, make sure the dough is not too wet or dry (add flour or extra water as needed)
  • Once the dough cycle is complete (about 1 hour 40 minutes), remove dough and gently roll into a ball
    • OR remove dough from machine after it is finished kneading- about 20 minutes- and place in a large, oiled, bowl. Cover with oiled plastic wrap and place in a warm area until doubled- about 1 hour), then remove dough and gently roll into a ball
  • Cut the ball into 8 equal parts and roll each of those into individual balls

Here's a photo of a few of the bread balls. They look bigger than they actually are..
photo of bread balls

  • Let rest for 10 minutes
  • Heat a large skillet (I used cast-iron) to medium heat
  • Working one at a time, take one dough ball and flatten it into roughly a 1/4" thick, 6" circle. If you're like me, your circles will leave much to be desired, so try and make a very thin polygon :). You will want to have lots of bubbles in your dough when you heat it, so the thinner the dough, the better
  • Add small amount of oil to skillet (if not using cast iron)
  • Add flattened dough and cook until bubbles form and bottom is brown (about 65 seconds). The first one will probably take longer to cook, but it's good to check at the 65 second mark. You are looking for the bubbles to be a golden brown. This means it is done

photo of Naan bread cooking

  • Flip bread and cook for an additional 65 seconds

photo of Naan bread cooking

  • Place cooked bread in brown paper bag and close top. this will help keep your bread moist
  • Repeat with remaining dough
Enjoy!

27 January 2012

My Pizza Dough Recipe

Here's a copy of the pizza dough recipe I use most every week. I use it not only for making pizzas, but calzones, cheesy bread, and French Bread. A photo follows at the end of the recipe.

What you need:
  • 1 ½ Cups warm water (about 110 degrees)
  • 3-3 ½ Cups flour (amount varies with humidity)
  • 1 ½ tsp. Yeast
  • 1 ½ tsp. Brown sugar
  • 1 tsp. Salt (I use onion salt for more flavor. If you do this, you can omit the onion powder)
  • 1 tsp. Garlic powder
  • 1 tsp. Onion powder
  • 1 tsp. Oregano
Putting it Together:
  • Set your bread machine to the "Mix Dough" setting and then add the brown sugar, water, and yeast. Let proof for about 5 minutes
  • Add 1 cup of flour and then olive oil, salt, garlic powder, onion powder, and oregano
  • Start the machine and add the remaining flour ½ cup at a time. Let the machine incorporate the flour before adding more. Once all flour is added, make sure the dough is not too wet or dry (add flour or extra water as needed)
  • Once the dough cycle is complete (about 1 hour 40 minutes), remove dough and gently roll into a ball
    • OR remove dough from machine after it is finished kneading- about 20 minutes- and place in a large, oiled, bowl. Cover with oiled plastic wrap and place in a warm area until doubled- about 1 hour), then remove dough and gently roll into a ball
  • Let rest for 10 minutes and then you are ready to create your pizza
  • You will have enough dough for 1 very large pizza or 2 smaller ones. Also, you could get 2 smaller pizzas and 2 calzones out of this recipe.
Here are a few ideas for you...

Taco Pizza

How to Make Calzones

My Version of Papa Murphy's Cheesy Bread


Here's a photo of the dough after it's been "de-fluffed" and shaped. This is the photo I used for the Cheesy Bread, so the dough is in a log shape. If you are making two pizzas with this recipe, then the log shape is fine, as it makes it easier to divide. If making one pizza, the dough should be in a ball shape.
photo of dough shaped in log

26 July 2011

How to Make Calzones

I've been having some fun playing with pizza dough and trying out new things. One of the things I have been playing around with recently is calzones. I got tired of just making pizzas (because I have SO much trouble rolling the dough into a circle) and cheesy bread, that I decided to try something different...hence, I began playing with calzones. This is just like making individual stuffed pizzas and you can have a lot of fun with it. Just let your creativity take over and see what deliciousness occurs.

photo of finished calzone

What you need

  • Your favorite pizza dough or use My Pizza Dough Recipe

  • Your favorite pizza sauce or you can use my Papa Murphy's Garlic Sauce recipe (a terrific white sauce)

  • Cheese and any other ingredients you may want to add, such as: green onions, olives, salami, ham, roast, bacon; the list is only limited to your imagination

  • Parchment paper to line your baking sheet

18 November 2010

White Dinner Rolls


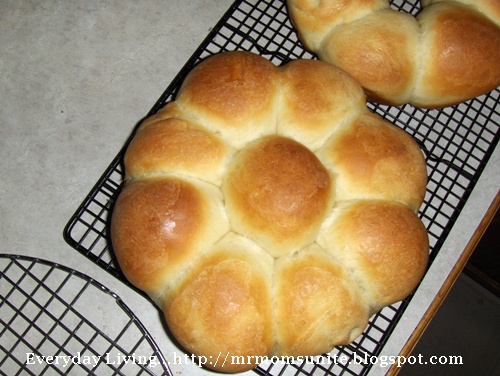
Photo of one pan of rolls after baking (using milk wash)...

photo of rolls after they have baked

Even though I am still working on this recipe (I'm taking several different recipes and trying to take the best from each one), the rolls that result from this recipe are extremely fluffy and soft. Over the past several weeks, I have been making this recipe and then freezing the result. Why? Well, my plan is to make these a few days in advance and then freeze them. On Thanksgiving (to save time), I will nuke them in the microwave and serve. In my test, I froze a batch for one week and then brought them in and let them thaw on the counter. I then nuked one for 10 seconds on high and tried it. The result was a slight depreciation in flavor, but the only reason I noticed it, was because I had tasted them fresh from the oven. You can make these fresh and serve or you can make them and freeze for later. I just wanted to point out that the freezing option is available.

Now, I've bored you enough, so on to the recipe...


What you need...

  • Yeast... 2 ½ tsp
  • Water... ½ cup (temperature roughly 105°)
  • Milk... 1 cup (scalded and then cooled to same temperature as water)
  • Bread flour... 3 ½ - 4 cups (amount will vary depending on humidity)
  • Eggs... 2
  • Butter (unsalted)... 4 Tbsp
  • Honey... 4 Tbsp
  • Salt... 1 - 1 ½ tsp
  • Cake pans or muffin pans if you prefer... 2


Putting it together...

06 October 2010

Focaccia Bread Recipe

Quite a while ago, I shared a focaccia bread recipe that used a sour dough starter, instead of yeast. Although, it tasted fantastic, I realize that many may not have a sour dough starter or just don't want to mess with one. This being the case, here is another focaccia bread recipe that uses yeast. For this particular recipe, you will need to begin it the night before by making a biga. If you follow the link, it will explain how to make this very fast and easy starter. The next day, just take your biga out of the fridge and bring to room temperature. An alternative would be to make the biga just before you go to bed and place it in a warm place; it will be ready and waiting for you the next morning.


What you need...

  • Warm water... 1  1/3 Cups
  • Active dry yeast... 1 tsp.
  • Bread flour (all-purpose will work nicely)... 3 Cups
  • 1 tsp of garlic powder
  • 1 tsp of oregano
  • ½ tsp of basil
  • ½ tps of thyme
  • Salt... 1 ½ tsp.
  • Biga... all of it (at room temperature)
  • Big bowl... (this dough is going to rise as much as 3-times its size)
  • Bowl scraper
  • Plastic wrap
  • Parchment Paper
  • Baking pan (9 x 13)... 1
  • Oil... for coating the bowl and plastic wrap
  • Spray bottle filled with water...set on mist

20 July 2010

Making a Biga

First off, I guess I should explain just what a Biga is. When making traditional Italian bread, the biga acts as a starter and is added to your regular dough recipe. It not only enhances the flavor, but it also affects the texture by giving the bread a lighter texture and giving it bigger holes (instead of the much smaller holes found in other breads). I need to note here that this is not a classic biga, which is taken from the unsalted dough of the bread you would have made previously and Thus can be a subject for another article.

08 May 2010

My Focaccia Bread Recipe

Firstly, I would like to thank Cinnamon Spice & Everything Nice for inspiring me to make this bread. I was over at her site and discovered her recipe and decided to adapt it using my sourdough starter. Now, if you do not have a sourdough starter and would like to make one, you can visit How to Make Sourdough Starter to get started. If you would just like to make the bread, but without using a sourdough starter, you can view my other Focaccia Bread Recipe.

06 May 2010

Recipes

I have provided a short snippet for each post, so hopefully it give you an idea as to what the entire article is about. Just click on the link, to read the entire article.

Recipes...


Here are just a few of the recipes that I have posted. All have been tried by me.

Focaccia Bread Recipe

Now, if you do not have a sourdough starter and would like to make one, you can visit How to Make Sourdough Starter to get started. If you would just like to make the bread, but without using a sourdough starter, please visit Cinnamon Spice & Everything Nice at the above link and you can follow her recipe. While there, please take the time to view some of her other mouth-watering recipes.


French Fry Dip

As you may or may not know, I like to make our own home-made fries (yep, another shameless recipe link) and I can think of nothing better to go with those fries, than a good dip. With this in mind, I decided to experiment with a dip I found over at Super Mommy to the Rescue (by the way, I stole the photo from Super Mommy, because her picture turned out a lot better than mine). Well, to the great shock and disbelief of my wife, I actually kept track of what and how much I added, so I am able to share this recipe with you. Although, we used this batch for the fries, this dip can be easily paired with chips or any veggies of your choice.


Roasted Tomato and Garlic Soup

Last summer, we had several huge batches of tomatoes from our garden and when the first batch landed in the kitchen, I did what I normally do with our tomatoes: make a batch of salsa. Well, that first batch gave us twelve quarts and with the next harvest we gained an additional fourteen quarts. So, with the thought of yet another harvest coming and finding ourselves chin deep in salsa (yup, shameless plug), my wife and I decided that we should think about doing something else. Putting our heads together, we came up with a brilliant plan: what about soup?


Thanksgiving Day Turkey

The above photo is a pretty good representation of what our turkey will look like when completed. You would have thought that after doing this for so many years, I would have thought to at least take one picture of ours. Unfortunately, whenever I do think about it, it's too late. Anyway, this is how I've been preparing our turkey for the past several years. It comes out very moist (thanks to the turkey bag) and the aromatics really give the turkey an added boost.
As an aside, even though it has never happened, I always have the fear that our turkey will turn out like the one an Christmas Vacation. Anyone else have this fear?


Salsa Recipe

Once again the tomatoes have invaded our home. From the time of only having one or two available to use, we now have 30-40 that are ripe and ready to go (what you see in the photo is less than half of the tomatoes we used). So, what to do with them all? Well today, I plan to make a few batches of salsa, but later harvests will be used for soup, tomato base, and just plain canning. This recipe is for a very large batch of tomatoes, if you have a much smaller harvest, you will need to halve or quarter this recipe. Now, on to the recipe...


How to Make Sourdough Bread Starter

Being that the cost of a loaf of sourdough bread is roughly $4.00, I decided that since we are trying to save money, why not try and make my own sourdough bread. So, with this thought echoing in my mind, I went on a journey to discover what I would need to do. I have made regular bread before, but I have never even attempted sourdough, basically because with terms like starter and sponge...it seems a little intimidating. However, as you will see, it is pretty easy.

Making a Biga


Making Italian Bread


Making Tangy Potato Salad

My wife and her family are having a get-together this weekend, so I once again had to open my big mouth and volunteer to make something. So, now I am now stuck with making potato salads for my wife and her family. Since I must now make not one, but two salads (again, the big mouth comes into play), I decided to give you the recipes so you can try them as well. The one today is the recipe I recreated from my grandmother's salad. I plan to begin this recipe on Thursday, which will allow the flavors in the salad to really become pronounced. As you will see, this makes a large amount of potato salad.


Apple Pie with Crème Fraîche and Black Pepper

Okay, I know it's strange posting the deserts first, but I like to make them a few days in advance. This way, they are not only done and out of the way, but it also allows the flavors to blend together longer. It may seem strange to use Crème Fraîche (a rich sour cream) and black pepper in an apple pie, but one taste of this pie and you may be hooked.

06 January 2010

Making Texas Brownies


photo of texas brownies

photo courtesy of...
retorte.blogspot.com
Yes, I had to use someone's photo, because stupid here forgot to take a picture, again.

I made these a few days ago for my wife's friend at work and I decided that you may all want to have a go at these brownies. I have made these several times over the years and I must say that it is the best brownie recipe I have ever come across. I originally got this recipe from About.com and I will provide a direct link to them at the end of this article. In the meantime, sit back, grab a cold glass of milk, and get ready to enjoy some of the best brownies you will ever taste. Oh, in case you're wondering, yes, I allowed myself a small piece of one.


What you need...


For the brownies...


Flour...2 cups
Sugar...2 cups
Butter...½ cup
Shortening...½ cup
Coffee...1 cup strong (I use an instant espresso for this)
Unsweetened cocoa...¼ cup
Buttermilk...½ cup
Eggs...2
Baking soda...1 tsp.
Vanilla Extract...1 tsp.


For the frosting...


Butter...½ cup
Milk...¼ cup
Cocoa...2 Tbsp
Powdered sugar...1 ½ cups
Vanilla Extract...1 tsp

Putting it together...

  1. Preheat oven to 400°
  2. Lightly grease an 11 X 17 inch baking pan (I don't have a pan of this size, so I just used a 9 X 13 inch pan and it worked just fine)
  3. Grab a large bowl and add the flour and the sugar
  4. Mix well
  5. In a large saucepan, add butter, shortening, coffee, and cocoa
  6. Over medium-high heat, stir constantly until the mixture boils (this takes about ten to fifteen minutes)
  7. Once it comes to a boil, pour over the flour/sugar mixture
  8. Using a whisk, mix to combine
  9. Add buttermilk, eggs, baking soda, and vanilla
  10. Mix until combined and then pour into you baking dish
  11. Bake for 20 minutes
    1. The Frosting...
    2. Whilst the brownies are baking, grab a saucepan and over medium-high heat, combine the butter, cocoa, and milk
    3. Stir constantly until it comes to a boil
    4. When it boils, turn-off the heat and add the powdered sugar and vanilla
      • I add the sugar ½ cup at a time and mix well after each addition.
    Back to the brownies...
  12. Using a toothpick or a knife, insert into the center of the brownies, if it comes out clean, your brownies are done
  13. If it does not come out clean, bake a few more minutes and recheck
  14. Continue with step 13 until they are done
  15. Once done, remove from oven and immediately pour frosting over your brownies
  16. While your brownies cool, take a glass of milk and place in freezer
  17. Once brownies are cool, I take a pizza cutter and spray it with Pam and use that to cut the brownies
  18. Grab your milk from the freezer and enjoy


texas brownies from about.com

25 September 2009

Chocolate Stout Cake

photo of the chocolate stout cake
image courtesy of... Bon Appétit

This is a cake I made for a birthday party at my wife's work. I thought it was rather strange to add stout to a cake, but I must say that it got rave reviews at her work. I found this recipe in Bon Appétit magazine. If you wish to see the original recipe, please click on the link to Bon Appétit below the picture.


What you need

Cake


  • 2 nine-inch diameter cake pans

  • Parchment paper

  • Off-set spatula

  • 3 ounces unsweetened chocolate

  • 2 ¼ cups all-purpose flour

  • 2 tsp. baking powder

  • ½ tsp baking soda

  • ½ tsp salt

  • 14 Tbsp (1 ¾ sticks) of salted butter, room temperature

  • 1 ¼ cups, plus 3 Tbsp of sugar

  • 3 large eggs, separated

  • ¾ cup chocolate stout (recommended , if you can find it), regular stout, or porter

  • 2/3 cup freshly brewed, strong coffee


    Frosting

  • 1-pound bittersweet chocolate (54% to 64% cacao), chopped

  • 2-cups heavy whipping cream

  • 1 tsp instant espresso powder

Putting it together

  1. First, get everything together that you will need, because you are going to be very busy over the next 30 minutes, or so

  2. Separate the eggs and keep them in the refrigerator until needed

  3. Butter and flour both cake pans

  4. Line bottom of cake pans with parchment paper

  5. Butter and flour the parchment paper

  6. Set oven rack to middle of oven and pre-heat oven to 350°

  7. Chop the chocolate and place it in a heat-proof bowl

  8. Place the bowl over a gently simmering water bath, stirring until melted (be sure to keep the chocolate warm)

  9. In a smaller bowl, mix together the flour, baking powder, baking soda, and salt

  10. Using a whisk mix the dry ingredients well, then set aside

  11. In larger bowl, place the butter and 1 ¼ cups of sugar until it becomes fluffy and becomes pale yellow in color (be sure not to skimp on this part, it should take anywhere from 2-4 minutes)

  12. Beat in the egg yokes, one at a time. Beat well after each addition

  13. Beat in the melted chocolate

  14. Ditto the stout and then the coffee

  15. Put the mixer on the lowest setting and add the flour mixture to the chocolate mixture in two increments. Mix only until the flour is just incorporated. You do not want to over-mix at this point

  16. Using clean, dry beaters, beat egg whites and the 3 Tbsp of sugar, until you get stiff peaks

  17. Fold the stiff egg whites into the cake mixture, 1/3 at a time

  18. Pour the batter into the cake pans

  19. Place in oven and time for 30 minutes or until a tooth pick inserted in the center of each cake comes out clean

  20. When the cakes are done, place on cooling racks for 20 minutes

  21. After 30 minutes, take the rear of a knife and score the sides of each cake

  22. Invert the cakes onto the cooling racks, remove the pans and the parchment

  23. Allow to cool fully


When you have a minute...

The frosting


  1. While your cake is baking, we can get started on the frosting. Don't worry, this part is much easier

  2. Chop the chocolate and place in a heat-proof bowl

  3. Pour the heavy cream in a sauce pan

  4. Add the espresso powder

  5. Over medium-high heat, bring to a simmer, stirring constantly

  6. Pour the cream mixture over the chopped chocolate and let sit for 1 minute

  7. After one minute, whisk the chocolate until fully melted

  8. cover and let cool in the refrigerator until it is of spreadable consistency (about 2 hours), stir occasionally


Frosting the cake


  1. When the cake is cool and the frosting is ready, using a serrated knife, slice the rounded (top) portions of your cakes, so that they are flat

  2. Place one cake cut-side down on your platter/plate


    • Tip: to keep your platter clean, take some parchment and cut into strips. Place the strips under the edges of your cake. You will need about three pieces of parchment to make sure the entire platter is covered. When you are done frosting, just gently pull the parchment away and marvel at your clean plate

  3. Dump about a cup of the frosting on the cake and spread evenly over the top. You will want roughly about a ¼ inch (6-7mm) thick layer of frosting

  4. Place the second cake, cut-side down on top of the first

  5. Spread the remaining frosting evenly over the top and sides of the cake

  6. Cover with a cake dome and store in the refrigerator


    • If you are like most of us and don't have a cake dome, just take a very large Tupperware-type bowl and place the cake on the lid (I use a bit of Velcro on the bottom of the platter and on the lid to attach the two; it also keeps the cake from banging around during transport). Then place the bowl over the cake and seal

  7. Before serving, let the cake come to room temperature

I hope you enjoy it!

20 November 2008

Apple Pie with Crème Fraîche and Black Pepper

What you will need:

Pie Crusts...2
Granny Smith Apples...2 1/2 lbs.
Sugar...about 3/4 cup plus 1tsp.
Fresh Lime Juice...2 Tbsp
Salt...Pinch
Black Pepper...1/4 tsp. (freshly ground, if possible)
Flour...4 Tbsp
Calvados or Brandy...1/4 Cup
Crème Fraîche...1/2 cup click here for recipe
Milk...about 1 Tbsp


  • Preheat oven to 4250F

  • Place 1 pie crust in pie pan

  • Peel, core, and cut the apples into 1/4 inch slices (you may also cut them into cubes, if you like; I've done it both ways

  • Place them in a bowl and add 3/4 cup of sugar, lime juice, salt, pepper, and flour

  • Toss to coat the apples evenly

  • Add the Calvados and the crème fraîche

  • Toss to mix well

  • Cover and let set at room temperature for 20 minutes

  • Taste the mixture and add sugar if necessary

  • Transfer mixture to the prepared pie pan and distribute evenly

  • Brush the edge of the dough with milk and place the second crust on top and seal

  • decoratively crimp the edge

  • Brush the top with remaining milk and sprinkle with the remaining teaspoon of sugar

  • Cut 3 vents in the top of the crust

  • Place on a baking sheet and place in oven

  • Bake for 15 minutes, then reduce heat to 3750F, and bake for an additional 55 minutes

  • Crust should be crisp and apples tender when pierced with a knife

  • Remove from oven and allow to cool 30 minutes


Recipe courtesy of Michael Kalanty of the California Culinary Academy

This is a pie I first made 9-10 years ago. After that first year, it has since become a Thanksgiving tradition.
This pie also makes a great gift. Prepare as above, but do not bake. Make a copy of the baking instructions and include that with the pie. I believe that the smell of an apple pie baking is also a gift.

Enjoy

Next time... Spinach and Artichoke Casserole
Related Posts Plugin for WordPress, Blogger...

Google Analytics