Showing posts with label thanksgiving. Show all posts

19 November 2011

Our Thanksgiving Day Menu 2011

Here is a list of the items we will be preparing for Thanksgiving. If you would like the recipes for any of these dishes (Each recipe comes with its own shopping list), please click the link and you will be taken to the appropriate page. If you have any questions on preparing any of the following recipes, please let me know in a comment.

Have a safe and Happy Thanksgiving!


I decided to make rolls this year...

photo of rolls after they have baked

White Dinner Rolls


Appetizers...

photo of cheesy bread

Cheesy Bread


You've got to have potatoes...

photo of whipped potatoes

Whipped Potatoes


How about some gravy to go with those potatoes...

Lump-Free Thanksgiving Gravy


Yes, we are doing stuffing as well. I just sauté celery, onions and add the stuff from the box, so I don't have anything written-up on it.


...And still in his bag, the star of the show...

photo of turkey

Thanksgiving Turkey


Now, for dessert...


photo of cheesecake

Spiced Pumpkin Cheesecake


and finally...

Apple Pie with Crème Fraîche and Black Pepper


Happy Thanksgiving, everyone!!

28 November 2010

The Guardian of the Coats


Koko guarding our guest's coats...

koko laying on the coats

On Thanksgiving, Koko appointed himself the guardian of the coats. He took a particular liking to my niece's wool coat (which he is laying on). Of course, his security services do not come without a price...she later rewarded him for his service with some choice pieces of turkey.

23 November 2010

Whipped Potatoes


Here's what they look like...

photo of whipped potatoes

This will be the last post on my Thanksgiving menu. I know, that in itself is reason to be thankful. There is the "Great Debate" as to whether to go mashed or whipped. If just making it for my family, I usually just do the mashed potato thing and save myself a little work. But, since this is a special occasion, I like to make things a little more fancy, which is why I choose to do the whipped potatoes. As you look over the ingredients to this recipe, you may raise your eyebrows when you come upon the buttermilk, but this will give your potatoes a nice, tangy flavor. As you can see, this recipe is somewhat large (I have to make enough for 23 people), but you can just scale-down the ingredients to suit your needs.

I hope you all have a very safe and Happy Thanksgiving!


What you will need...

  • Potatoes...10 pounds (1 bag)
  • Butter...½ to 1 stick
  • Salt...to taste
  • Pepper...to taste
  • Buttermilk...½-1 cup
  • Parmesan Cheese...1-2 cups (I know it's a lot, but I love to make it cheesy. You can also substitute the Parmesan for any type of cheese you like
    • measurements are estimates and based upon texture/taste

22 November 2010

Thanksgiving Turkey


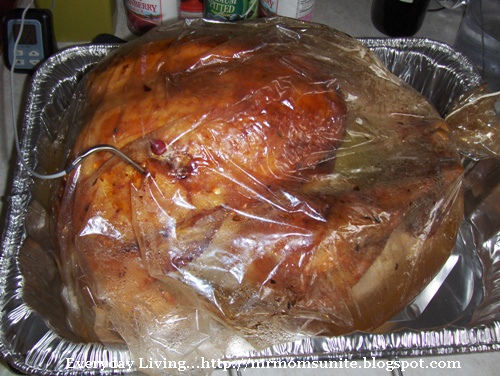
photo of a cooked turkey


I figured that since many of us will be hitting the stores today or tomorrow, I would share my turkey recipe with you today, instead of waiting until tomorrow. The above photo was taken just after the turkey came out of the oven. You can see, that I like to cook it inside a bag. I find that this really helps keep-in the moisture.

I have been making our turkey using this recipe for the past several years. It comes out very moist and the flavoring from the oranges, various herbs, and the onions really boost the flavor. A few years ago, I was lazy and decided not to go to the extra trouble and do all of this. Well, right off the bat, everyone noticed the difference. So, I make it a point to go the extra mile. Oh, and on a positive note, in the many years I have made this, I have never had to drive someone to the ER :)


What you will need...

  • Turkey...any size, we usually get between 20-25 lbs.
  • Turkey bag...used in the baking process
  • Turkey Pan
  • Broiler Pan
  • Meat Thermometer (Example of the kind I use, is at bottom of page)
  • Flour...1 Tbsp
  • Compound Butter...Click here for recipe
  • Oranges...2-3
  • Onions...any leftover from other recipes
  • Celery...any leftover from other recipes
  • Herbs...any leftover from other recipes

21 November 2010

Spinach and Artichoke Stuffing Recipe

I served this bad boy a few years ago and it disappeared within a matter of minutes. Even my two veggie-hating kids liked it. When you first look at this recipe for Spinach and Artichoke Stuffing, it may seem rather complex, but it is actually very easy to put together. The trick is to get everything organized and then just follow the steps. I hope that you will like this as much as my family did. Again, if you run into any problems or have a question, please let me know and I will do my best to help. Oh, you can also put this together the night before and then bake on the big day. Now, here's the recipe...


What you will need...


  • extra-virgin olive oil... ¼ cup

  • spinach...2 ½ pounds , washed (3 cups cooked and roughly chopped)

  • yellow onions...2 cups chopped

  • garlic...1 Tbsp roughly chopped

  • Emeril's Italian Essence (recipe here), or other Italian Seasoning blend...1 Tbsp plus 2 tsp

  • salt...2 ½ tsp

  • black pepper...1 ¼ tsp freshly ground

  • artichoke hearts...3 (8 ½-ounce) cans quartered , any tough outer leaves removed

  • eggs...2 large

  • heavy cream...1 ½ cups

  • chicken stock...2 cups

  • lemon juice...2 Tbsp

  • French bread...12 to 14 cups cubed (1-inch) day-old (1 loaf)

  • Brie...1 pound , rind removed and cut into ½-inch cubes


    • TIP: To make it easier to trim the rind from the Brie, wrap the Brie in foil and place it in the freezer for about an hour. This will firm it up and make rind-extraction much easier

  • Parmesan...½ cup freshly grated

  • parsley leaves...¼ cup minced fresh

20 November 2010

Apple Pie with Creme Fraiche and Black Pepper Recipe

Here is the recipe for the second dessert we will be serving for Thanksgiving. Although not really a traditional pie for the Thanksgiving table, ever since I introduced this more than twelve years ago, Apple Pie with Crème Fraîche and Black Pepper has become a tradition. I found that making this pie a few days before the "Big Event", enhances the flavors (not to mention cuts-down on the last minute preparations).
photo of finished apple pie


This pie also makes a great gift. Prepare as shown, but do not bake. Make a copy of the baking instructions and include that with the pie. I believe that the wonderful aroma of an apple pie baking is also a gift (boy, that sounds sappy, doesn't it?). Anyway, without any further ado, here's the recipe...


What you will need...


  • Pie Crusts... 2

  • Granny Smith Apples... 2 ½ lbs.

  • Sugar... about 3/4 cup plus 1tsp.

  • Fresh Lime Juice... 2 Tbsp

  • Salt... Pinch

  • Black Pepper... ¼ tsp. (freshly ground, if possible)

  • Flour... 4 Tbsp

  • Calvados or Brandy... ¼ Cup

  • Crème Fraîche... ½ cup click here for recipe

  • Milk... about 1 Tbsp

19 November 2010

Spiced Pumpkin Cheesecake Recipe

My wife found this recipe while leafing through a magazine and wanted me to make it for a party she was having at her work. Well, I made it and it was a big success, so "The Boss" decided that we would add it to our Thanksgiving menu. This will be one of two desserts we will be making and I think it will be a great addition to the table.


What you need...


  • Ginger Snaps... About 38. When finely chopped, you should end up with about 1-½ cups

  • Pecans... ¼ cup; finely chopped

  • Butter (unsalted, please)... ¼ cup (which is 4 Tbsp), melted

  • Cream Cheese... 4 pkg. (8 oz. each), softened

  • Sugar... 1 cup

  • Pumpkin... 1 can (15 oz.)

  • Pumpkin pie spice... 1 Tbsp.(bulk recipe at end of page)

  • Vanilla... 1 tsp

  • Eggs... 4

  • 9-inch springform pan

  • Large baking pan that your springform pan can fit into

  • Parchment paper

18 November 2010

White Dinner Rolls


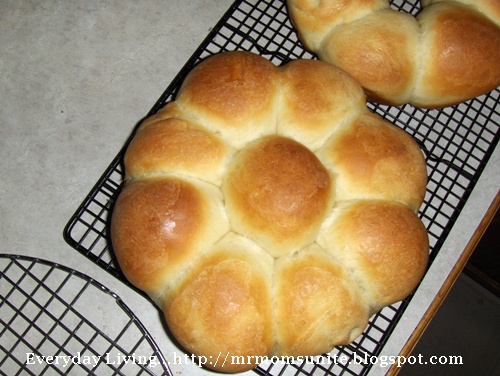
Photo of one pan of rolls after baking (using milk wash)...

photo of rolls after they have baked

Even though I am still working on this recipe (I'm taking several different recipes and trying to take the best from each one), the rolls that result from this recipe are extremely fluffy and soft. Over the past several weeks, I have been making this recipe and then freezing the result. Why? Well, my plan is to make these a few days in advance and then freeze them. On Thanksgiving (to save time), I will nuke them in the microwave and serve. In my test, I froze a batch for one week and then brought them in and let them thaw on the counter. I then nuked one for 10 seconds on high and tried it. The result was a slight depreciation in flavor, but the only reason I noticed it, was because I had tasted them fresh from the oven. You can make these fresh and serve or you can make them and freeze for later. I just wanted to point out that the freezing option is available.

Now, I've bored you enough, so on to the recipe...


What you need...

  • Yeast... 2 ½ tsp
  • Water... ½ cup (temperature roughly 105°)
  • Milk... 1 cup (scalded and then cooled to same temperature as water)
  • Bread flour... 3 ½ - 4 cups (amount will vary depending on humidity)
  • Eggs... 2
  • Butter (unsalted)... 4 Tbsp
  • Honey... 4 Tbsp
  • Salt... 1 - 1 ½ tsp
  • Cake pans or muffin pans if you prefer... 2


Putting it together...

17 November 2010

Making Ricotta Cheese

This is the third and final post that will deal with my Thanksgiving preparations. After this cheese is made, I will have all the custom ingredients needed to begin making my other recipes. This cheese will be used in making the manicotti and, if there is any left over, I may add some to a portion of the whipped potatoes.

Although, the idea of making ricotta cheese may seem intimidating at first, making this cheese is actually very easy. In addition, if you are a family that uses ricotta cheese a great deal, you will find that making it yourself will save you money. Next time you are in the store, price-out the cost for a gallon of milk and a bottle of vinegar (which you can use for several batches of cheese and other things as well) and compare it to the cost of a single container of ricotta cheese. You will be able to see how cost-effective it is to make yourself. As always, if you have any questions, please feel free to let me know and I will do my best to assist you.


What you need

  • One gallon of whole milk
  • Salt (I use Kosher salt)... ¼ - ½ tsp (depends on how salty you like your cheese)
  • White vinegar... 1/3 cup, plus 1 tsp
  • Thermometer
    Here's one like I use... Polder Classic Cooking Thermometer/Timer, Graphite
  • Cheese cloth
  • Large, non-reactive pot
  • Colander

15 November 2010

My Thanksgiving Schedule and Crème Fraîche

Here is the second installment in my getting-ready-for-Thanksgiving posts. Here is a sample schedule that I will be using this year, which will help ease the stress (Yeah, right) of the Holiday:

  • Saturday... Cleaning the kitchen (the worst part of getting ready)

  • Sunday... Make the Crème Fraîche and compound butter

  • Monday... Complete cleaning the kitchen

  • Tuesday... Making the apple pie, pumpkin cheesecake, and the rolls

  • Wednesday... getting the Manicotti ready (will bake on Thanksgiving), get the turkey ready for it's starring role, and generally making sure everything is good to go

  • Thanksgiving... The madness begins

I use the Crème Fraîche (basically a very rich sour cream) in my apple pie (I will share this recipe in the next few days) and any leftovers you may have can be easily used as an additional garnish for your mashed/whipped potatoes. The recipe for the Crème Fraîche is very easy and takes very little preparation, however, it does take 24 hours for it set, so it is best to make the one or two days before you plan on making your apple pie. For example, I usually make the pie on Tuesday, so I will start the Crème Fraîche on Sunday night.

photo of Crème Fraîche
photo courtesy of... artistta.blogspot.com

Crème Fraîche:

Things you'll need:

Heavy Cream...1 cup
Butter Milk...1 Tbsp
jar w/lid...1

13 November 2010

Our Thanksgiving Menu and Making Compound Butter

Wow, a compound title...

Okay, here's our Thanksgiving menu:

  • Dinner Rolls...I'm tweaking the recipe as I write this, so we will see how it turns out. Hey, I actually kept track of the measurements this time

  • Whipped Potatoes...there's a shock

  • Manicotti...Yes, something different and just because I won't have enough to do, I'll be making my own Ricotta cheese to use in it. I am currently trying to find a recipe for this, so if you have one, please let me know. As soon as I have made and tried a successful recipe, I will share it with you

24 November 2009

Your Guide to Lump-Free Gravy


This is the last in my series of Thanksgiving Day posts, so I hope the previous articles have given you some new ideas to try. The following gravy is flavored with the dripping from your turkey and is not made from the giblets. I hope you all have a terrific Thanksgiving.


What you will need...

Turkey drippings
Flour
Butter...unsalted, please
Cardamom...To taste
Salt or 1-Chicken Bouillon Cube (crushed)...To taste
Pepper...To taste
For adding the flour and the butter (making the roux), I use a 1:1:1 ratio...1 Tbsp of butter to 1 Tbsp of flour to 1 Cup of liquid. I will be writing this recipe to accommodate 3 Cups of turkey drippings...


Putting it together...

  • Try and separate the fat from the turkey drippings
  • In a sauce pan over medium heat, melt 3 Tbsp butter
  • Once melted, add 3 Tbsp of flour and whisk to combine
    • Now is decision time. How dark do you want your gravy, because the longer you stay at this step, the darker your gravy will be. I like my gravy to be somewhat lighter, so I will whisk over medium heat for about 5 minutes. If you want your gravy darker, keep whisking. For a very dark gravy, as in a gumbo, you will be at this step for about twenty minutes
  • Once you reach your desired color, slowly add the 3 cups of turkey drippings; whisking constantly
  • add salt or crushed bouillon, pepper, and cardamom (cardamom has a rather strong flavor, so I like to start with this small amount and continue adding until I reach the desired flavor...start with a ½ tsp
  • Continue adding the pepper and cardamom, until you are happy with the flavor.
  • Continue whisking until the gravy boils (This is when it will reach its full thickening potential)
  • You should end up with a very tasty, lump-free gravy
  • If you need to delay service, take some plastic wrap and set it directly on top of the gravy. This will help prevent that wonderful "skin" from forming


Troubleshooting...

Gravy seems to be "missing something"...I usually crush a chicken bouillon cube and add it to the gravy. This seems to correct the problem. If not, try adding some chicken stock or experiment with a little crushed sage or a very tiny amount of mace. If the gravy has too strong of a turkey flavor, you might want to dilute it with water or, if you don't mind a white gravy, add milk or cream.

Gravy is not thick enough...In a separate bowl, spoon-in about a half cup of your gravy and whisk an additional Tbsp of flour. Once well incorporated and no lumps visible, add it back into the main gravy and whisk well. Bring to a boil. If this does not thicken it to your liking, grab a bowl and place a tablespoon of flour in it. Then, take some of your hot gravy and mix it with the flour (if you add the flour directly into your gravy, you will get lumps, so we take this extra step). Once the flour is fully incorporated, mix it in with your gravy. Repeat until you get the your desired consistency.


Something else you might want to try...

  • Replace the cardamom with a spice called Grains of Paradise


Originally published as...My Thanksgiving Gravy

23 November 2009

My Thanksgiving Turkey


photo of a cooked turkey


This is how I've been preparing our turkey for the past several years. It comes out very moist (thanks to the turkey bag) and the aromatics really give the turkey an added boost.

As an aside, even though it has never happened, I always have the fear that our turkey will turn out like the one an Christmas Vacation. Anyone else have this fear?


What you will need

Turkey...any size, we usually get between 20-25 lbs.
Turkey bag...used in the baking process
Turkey Pan
Broiler Pan
Meat Thermometer (Example of the kind I use, is at bottom of page).
Flour...1 Tbsp
Compound Butter...Click here for recipe
Oranges...2-3
Onions...any leftover from other recipes
Celery...any leftover from other recipes
Herbs...any leftover from other recipes


Cooking the Bird

  • First remove the surprise packages in the neck and the body cavity
  • Rinse the bird inside and out
  • Remove the pop-up thermometer
    • These things are set to pop at 1850. Your bird will continue to cook while resting and the final internal temperature will be around 1950 or more. This will give you a turkey that is less moist than I prefer. I use my own thermometer and remove the turkey at about 1600 to 1700, which will give you a nice, moist turkey that is also well-cooked (final temperature around 1700 to 1800).
  • Take the Turkey bag and put the flour inside it, then shake to coat the bag
  • Work your fingers between the skin and the breast on both sides...making a cavity
  • Take the compound butter, slice it, and insert in the cavities you created
  • Once the cavities are filled, cut the oranges in half and squeeze juice over the turkey
  • Place used oranges inside the body cavity
  • Place a few slices of your compound butter inside
  • Place any extra herbs, onions, celery, etc, inside the body cavity
    • These are used ONLY as aromatics and are NOT to be eaten
    • These additions will help flavor the turkey as it bakes
  • Place turkey pan on broiler pan (I never trust those turkey pans to be able to hold the weight of a turkey)
  • Place the bird in the turkey bag, use the supplied tie to close the bag
  • Cut a few slits in the bag, and place on pan
  • Insert thermometer, through the bag, into the thickest portion of the bird
  • Place the turkey in the oven and cook according to the directions
  • When the thermometer reaches 1650- 1700 remove the turkey and let rest at least 30 minutes
    • Your turkey will continue to cook and carry-over will continue to raise the temperature an additional 10 degrees
  • Remove the aromatics and discard
  • It will looked burned where the compound butter was placed, but believe me, it isn't
  • Cover with foil and let rest for 30 minutes (I'm sure you will be able to find something to do while the turkey rests)
  • You should end up with a nice, moist turkey with a great flavor

Here is a thermometer like the one I use. Very good and versatile...

photo of probe thermometer


Originally published as...How to Cook Your Thanksgiving Turkey

21 November 2009

Whipped Potatoes for Thanksgiving

As you look over the ingredients to this recipe, you may raise your eyebrows when you come upon the buttermilk, but this will give your potatoes a nice tangy flavor. If you're unsure that you want to release this powerhouse of taste on Thanksgiving, why don't you make a smaller batch and try it out first. Just substitute buttermilk for the milk or cream you usually add.

What you will need:...

Potatoes...10 pounds (1 bag)
Butter...½ to 1 stick
Salt...to taste
Pepper...to taste
Buttermilk...½-1 cup
Parmesan Cheese...1-2 cups

measurements are estimates and based upon texture/taste


Putting it Together...

  1. Skin potatoes and cut into quarters (this allows the potatoes to cook more quickly)
  2. Put in large pot, add water and salt (I usually put in a few chicken bouillon cubes to add a little flavor to the potatoes).
  3. When fork tender, remove from heat and drain
  4. Turn-off burner and replace potatoes in pot and return to burner. This will allow the excess water to steam out of the potatoes. Be sure to keep an eye on them, so they do not burn
  5. Place the potatoes in a bowl
    • If they do not all fit, you will need to repeat the following steps with the remaining potatoes (although cutting-back on the measurements)
  6. Add butter, salt, and pepper
  7. Mash with a potato masher and then use a hand mixer to blend
  8. Add 1/2 cup of Buttermilk and continue whipping
  9. Add additional buttermilk until you reach the desired consistency
  10. Add additional salt and pepper to taste
  11. Add the Parmesan cheese and mix until well incorporated
  12. Take any additional potatoes and repeat steps 6-11

Here's what they look like...

photo of whipped potatoes


Originally posted as... Tangy Whipped Potatoes

18 November 2009

My Favorite Pumpkin Pie


Double-Layer Pumpkin Pie


What you will need:

Ready Made Pie Crust...1 (pre-backed)
Cream Cheese...4 oz, softened
Cool Whip...1 ½ cups,
Pumpkin...1 can, 16oz
Jello Pudding Instant Vanillas Pudding...2 packages (4 serving size)
Cold Milk...1 cup plus 1 Tbsp
Sugar...1 Tbsp
Ground Cinamon...1 tsp
Ground Ginger...½ tsp
Ground Cloves...¼ tsp


Putting it together...

  • Preheat oven to 4500

  • Poke the bottom and sides of pie crust with a fork

  • Back pie crust in oven for 10-12 minutes

  • In a large bowl, mix Cream Cheese, 1 Tbsp of milk, 1 Tbsp Sugar until smooth

  • Gently stir in Cool Whip

  • Empty mixture in the bottom of the crust and spread evenly


    • In another bowl, pour 1 cup of milk

    • Add pumpkin, pudding mixes, and spices

    • Mix well

    • Spread over cream cheese layer


  • Refrigerate for 4 hours or until set


Now, being lazy and since my wife doesn't like the graham cracker crust, I use the ready-made pie crust. However, if you like graham crackers, here is the recipe for the crust (the way I like it).

Graham Cracker Crust...


What you will need:

graham cracker crumbs...1 ½ cups (about 20 squares)
butter...1/3 cups, melted
Measurements courtesy of Betty Crocker


Putting it together...

  • Combine the graham cracker crumbs and melted butter

  • Mix well

  • Layer bottom and sides of pie pan


Originally published as...Double-Layer Pumpkin Pie

17 November 2009

My Classic Apple Pie

Okay, I know it's strange posting the deserts first, but I like to make them a few days in advance. This way, they are not only done and out of the way, but it also allows the flavors to blend together longer. It may seem strange to use Crème Fraîche (a rich sour cream) and black pepper in an apple pie, but one taste of this pie and you may be hooked. Anyway, this is one of two pies that I make for Thanksgiving. I will share the pumpkin pie recipe tomorrow.


Apple Pie with Crème Fraîche and Black Pepper


What you will need:

Pie Crusts...2
Granny Smith Apples...2 ½lbs.
Sugar...about ¾ cup plus 1tsp.
Fresh Lime Juice...2 Tbsp
Salt...Pinch
Black Pepper...¼ tsp. (freshly ground, if possible)
Flour...4 Tbsp
Calvados or Brandy...¼ Cup
Crème Fraîche...½ cup click here for recipe
Milk...about 1 Tbsp


Putting it together...

  • Preheat oven to 4250F

  • Place 1 pie crust in pie pan

  • Peel, core, and cut the apples into ¼ inch slices (you may also cut them into cubes, if you like; I've done it both ways

  • Place them in a bowl and add ¾ cup of sugar, lime juice, salt, pepper, and flour

  • Toss to coat the apples evenly

  • Add the Calvados and the crème fraîche

  • Toss to mix well

  • Cover and let set at room temperature for 20 minutes

  • Taste the mixture and add sugar if necessary

  • Transfer mixture to the prepared pie pan and distribute evenly

  • Brush the edge of the dough with milk and place the second crust on top and seal

  • decoratively crimp the edge

  • Brush the top with remaining milk and sprinkle with the remaining teaspoon of sugar

  • Cut 3 vents in the top of the crust

  • Place on a baking sheet and place in oven

  • Bake for 15 minutes, then reduce heat to 3750F, and bake for an additional 55 minutes

  • Crust should be crisp and apples tender when pierced with a knife

  • Remove from oven and allow to cool 30 minutes


Recipe courtesy of Michael Kalanty of the California Culinary Academy

This is a pie I first made about 11 years ago and after that first year, it has since become a Thanksgiving tradition.
This pie also makes a great gift. Prepare as above, but do not bake. Make a copy of the baking instructions and include that with the pie. I believe that the smell of an apple pie baking is also a gift.

Enjoy

Originally published as... Apple Pie with Crème Fraîche and Black Pepper

16 November 2009

Getting Ready for Thanksgiving

As you know, Thanksgiving is just over a week away and if you are anything like me, you will be scrambling to get the house cleaned and trying to put together a menu. So, with this in mind, over the next week or so, I will dust-off some of my old Thanksgiving Day recipes and share them with you. Although I can't help you with the cleaning, maybe I can help you with the menu.

So, to start things off, I have included a few items that I make every year. These two items need to be made several days in advance, so I usually start the Crème Fraîche (for use in an apple pie) on Sunday and the compound butter (for use in the turkey) on Monday.


Crème Fraîche:

Things you'll need:

Heavy Cream...1 cup
Butter Milk...1 Tbsp
jar w/lid...1


Putting it together...

  • pour heavy cream into jar

  • add buttermilk

  • mix well

  • put lid on jar and let stand at room temperature for 24 hours, then refrigerate

  • can be stored for up to a week

  • Any left-over Crème Fraîche can be used as a very rich sour cream.


    Compound Butter:


    Things you'll need:

    Butter...1 lb. (4 sticks) unsalted, please
    Fresh Sage...1 Tbsp
    Fresh Rosemary...1 Tbsp
    Fresh Thyme...1 Tbsp
    Olive Oil...1Tbsp

    These three (sage, rosemary, and thyme) are also referred to as a Poultry Mix. All measurements are considered a baseline; if you prefer a stronger flavor, you can increase the amount of herbs or reduce the amount for a milder flavor. If you cannot find fresh herbs and need to use dried herbs, you will need to reduce the baseline measurements by 1/2, as the dried herbs have a more concentrated flavor.


    Putting it together...

  • Place butter on counter to soften

  • Take the herbs (try to avoid including the stems) and chop them very fine or, if you have a food processor, place them in there and pulse until finely chopped.

  • Next take your softened butter and place in your food processor

  • Add a small amount of olive oil (1Tbls)


    • If you do not have a food processor (like me), place butter and herbs in a bowl and mix with a hand-mixer until well combined.


  • Pulse until well combined

  • Take plastic wrap and place on the counter

  • empty butter onto the plastic wrap

  • fold the wrap over the butter

  • Using the edge of a cookie tray or other straight object, press it against the butter and tightly form into a log about 1-inch in diameter (the plastic wrap acts as a mold)

  • careful not to get the plastic wrap under the butter, roll-up and twist both ends

  • place butter in refrigerator

24 December 2008

Green Bean Casserole

photo of Koko in a Santa hat


This recipe is doubled from the original of 6-8 servings. If that is the number of servings you need, please click on the link below and it will take you to the original site.


What you Will Need

* 4 teaspoons unsalted butter
* 3 pounds green beans, ends trimmed and cut lengthwise into thin strips and blanched
* 4 1/2 cups Cream of Wild Mushroom Soup, click on link for recipe
* 4 tablespoons Essence, plus 2 teaspoons, click on link for recipe
* 4 cups grated Fontina **Hint: Fontina is a soft cheese, so put in the freezer for about an hour or so, this will firm it up and make grating much easier

If you wish to forego having to go to all the work of frying the onions, you can use French's Fried Onions, instead and disregard the remaining ingredients.
* 4 to 5 cups vegetable oil
* 4 large yellow onions, peeled and thinly sliced (about 1/16- inch thick)
* Hot pepper sauce
* 2 cups all-purpose flour

Putting It Together

Preheat the oven to 350 degrees F. Grease a 2-quart baking dish with the butter and set aside.


  1. In a large bowl, combine the green beans, Wild Mushroom Soup, 2 teaspoons of Essence, and 3 cups of the cheese, and stir well

  2. Pour into the prepared dish, sprinkle the remaining 1 cup of cheese on top, and bake until bubbly, 25 to 30 minutes (this is the original baking time and ha NOT been doubled like the rest of the recipe, so it may take longer to heat through. After 30 minutes, I would watch it closely)

  3. In a large saucepan, add enough oil to come about 3 inches up the sides, and heat to 360 degrees

  4. Pat the onions dry

  5. Drizzle the hot sauce over the onions and then toss

  6. In another bowl, add the flour and 2 tablespoons of Essence and mix to combine

  7. Add the onions and toss to coat

  8. Remove any excess flour from the onions and add to the hot oil

  9. Cook, stirring occasionally, until crisp and golden brown, 1 1/2 to 2 minutes

  10. Remove from oil and let drain on paper towels

  11. Place onions on the top of the casserole and serve


    • If you are lazy like me, you can skip steps 3-10 and just use the traditional French's French Fried Onions
Photo courtesy of... Food Network

Recipe courtesy of... Food Network and Emeril Lagasse
.

23 December 2008

Cream of Wild Mushroom Soup

Koko sleeping covered with presentsI have been volunteered into making the infamous Green Bean Casserole for Christmas dinner. However, instead of doing it the traditional way, I plan to kick it up a notch and try Emeril's recipe. Now, the original recipe serves 8 people, so I doubled it, because I want a lot left-over to freeze. If you do not want this option, then I would suggest going to the original site (link at bottom) and following those proportions. You will have more than enough for the doubled Green Bean Casserole recipe. This recipe consists of two parts: the first part can be made ahead of time (I just finished making this about 2 hours ago) and is outlined below. The second part is put together on the day it is eaten.

Makes 16 servings

What you Need...

* 12 tablespoons unsalted butter
* 2 cup chopped yellow onions
* 1 cup chopped celery
* 1/2 teaspoon cayenne
* 3 teaspoons minced garlic
* 12 ounces shiitake mushrooms, wiped clean, stems trimmed, and sliced
* 12 ounces oyster mushrooms, wiped clean, stems trimmed, and sliced
* 16 ounces cremini or button mushrooms, wiped clean, stems trimmed, and sliced
* 4 teaspoons fresh thyme leaves
* 2 teaspoons salt
* 2 teaspoons freshly ground black pepper
* 2/3 cup brandy
* 12 cups chicken stock
* 3 cups heavy cream

Putting it Together...

  1. In a large stock-pot, melt the butter over medium-high heat.

  2. Add the onions, celery, and cayenne

  3. cook, stirring until they are soft, about 5 minutes

  4. Add garlic and cook an additional 30 seconds

  5. Add the mushrooms, thyme, salt, and pepper

  6. cook, stirring until the mushrooms shed their liquid and start to brown, around 7-8 minutes

  7. Add the brandy and bring to a boil

  8. cook until everything is glazed, about 2 minutes


    • You will notice that the veggies and the mushrooms will become shiny, this is what you are looking for

  9. Add the stock, stir, and bring to a boil

  10. Reduce heat to medium-low and simmer for 15-20 minutes, stirring occasionally

  11. Remove from the heat and puree with a hand-held immersion blender, or in batches in a food processor or blender


    • If you are going to freeze any of this soup, now is the time to do so...without adding the cream.

    • If you do freeze some, you will need to adjust the amount of cream you add to the remainder. I would suggest adding it per your taste and the desired consistency

  12. Add the cream, return to a simmer, and cook for 5 minutes


    • If you cannot have uncultured dairy products, you can replace the cream with sour cream or, if you feel fancy, Crème Fraîche. Note, you will need to add it as you would a roue; otherwise you will get lumps


  • Remove from the heat and adjust seasoning, to taste


  • Photo courtesy of... tweet-n-eats

    You will need approximately 4 1/2 cups of this soup for the casserole. I was left with just about 5 quarts that I was able to freeze.

    Recipe courtesy of... Food Network and Emeril Lagasse

    Next Time: The Green Bean Casserole
    25 November 2008

    My Thanksgiving Gravy

    Here is what I did last year for my gravy. I am changing it a bit this year, so I'll have to see how it goes. However, according to a trial gravy I made using chicken stock, it should turnout pretty good.


    What you will need...

    Turkey drippings
    Flour
    Butter...unsalted, please
    Cardamom...To taste
    Salt/Chicken Bullion Cube (crushed)...To taste
    Pepper...To taste
    For adding the flour and the butter, I use a 1:1 ratio...1 Tbsp of butter to 1 Tbsp of flour to 1 Cup of liquid. I will be writing this recipe to accommodate 3 Cups of turkey drippings...


    The Gravy Groove...


    • Try and separate the fat from the turkey drippings

    • In a sauce pan over medium heat, melt 3 Tbsp butter

    • Once melted, add 3 Tbsp of flour and whisk to combine


      • Now is decision time. How dark do you want your gravy, because the longer you stay at this step, the darker your gravy will be. I like my gravy the same color as my hair, blond. So, I whisk over medium heat for about 5 minutes


    • Once you reach your desired color, slowly add the 3 cups of turkey drippings; whisking constantly

    • add pepper and cardamom (cardamom has a rather strong flavor, so I like to start with this small amount and continue adding until I reach the desired flavor...start with a 1/2 tsp

    • Continue adding the pepper and cardamom, until you are happy with the flavor.

    • Continue whisking until the gravy boils (This is when it will reach its full thickening potential)

    • You should end up with a very tasty, lump-free gravy

    • If you need to delay service, take some plastic wrap and set it directly on top of the gravy. This will help prevent the wonderful "skin" from forming


    Troubleshooting...

    Gravy seems to be missing something...I usually crush a chicken bouillon cube and add it to the gravy. This seems to correct the problem. If not, try adding some chicken stock or experiment with a little crushed sage or a very tiny amount of mace.

    Gravy is not thick enough...In a separate bowl spoon in about a half cup of your gravy and whisk an additional Tbsp of flour. Once well incorporated and no lumps visible, add it back into the main gravy and whisk well. Bring to a boil. If this does not thicken it to your liking, repeat until you get the your desired consistency.

    What I am doing different this year...

    I am replacing the cardamom with a spice called Grains of Paradise. I purchase it whole and then grind the amount I will use. My "trial run" with the chicken stock turned out very well, so I figured I would give it a shot on the Big Day. I'll let you know how it goes.

    Of interest...How to Cook Your Thanksgiving Turkey
    Related Posts Plugin for WordPress, Blogger...

    Google Analytics