Showing posts with label cooking. Show all posts

01 September 2009

My Salsa Recipe


bunch of tomatoes
Once again the tomatoes have invaded our home. From the time of only having one or two available to use, we now have 30-40 that are ripe and ready to go (what you see in the photo is less than half of the tomatoes we used). So, what to do with them all? Well today, I plan to make a few batches of salsa, but later harvests will be used for soup, tomato base, and just plain canning. This recipe is for a very large batch of tomatoes, if you have a much smaller harvest, you will need to halve or quarter this recipe. Now, on to the recipe...

    What you need...

  • 30-40 tomatoes (comes out to around 8 quarts)

  • 3 batches of green onions (12-15 individual plants)

  • Approximately 36-40 ounces of roasted Chile peppers (the cans come in various sizes, so we get a 28 oz can and a 12 oz can. You can add more or less, depending on your preferences) (We use mild peppers, but you can use hotter ones if you wish)

  • 1 cup of white distilled vinegar (5% acidity)

  • 1 tablespoon pickling salt


    What to do...

  1. Core the tomatoes


    • Doing it now is much easier than doing it after you have removed the skins. If you are unsure of how to do this, I have provided a short guide for you... How to Core Tomatoes

  2. Remove the skins from the tomatoes


    • If you are unsure of how to do this, I have provided a short guide for you... How to Peel Tomatoes


  3. Cut the tomatoes into fourths and than eighths (you want to end-up with average-sized chunks)

  4. tomatoes cut in fourths

    • Tip: You will notice that the cutting board is resting inside a baking dish. This is to contain the vast amount of tomato juice that is released while cutting

  5. Place chopped tomatoes in a Large bowl

  6. Thinly slice the green onions and add to tomatoes

  7. Dice the chilies and add to tomatoes

  8. Add vinegar

  9. Add salt

  10. Mix well

If you are only interested in making a fresh salsa and plan to use this entire amount within a week or so, than you are done. The flavors will intensify over time. You can also do this step a day before the actual canning process; just keep the salsa covered and in the refrigerator.

If you plan to can the salsa, I will supply the instructions I use in my next article... Canning your Salsa

24 August 2009

How to Make Sourdough Starter

photo of my sourdough breadBeing that the cost of a loaf of sourdough bread is roughly $4.00, I decided that since we are trying to save money, why not try and make my own sourdough bread. So, with this thought echoing in my mind, I went on a journey to discover what I would need to do. I have made regular bread before, but I have never even attempted sourdough, basically because with terms like starter and sponge...it seems a little intimidating. However, as you will see, it is pretty easy. I have already tried the following recipe and, believe it or not, it actually works. I made one loaf yesterday (pictured above with some Parmesan cheese sprinkled on top) and, as I write this, I am proofing a loaf of french bread (which I'm going to pour a mixture of melted butter and granulated garlic over before baking).

    What you need


  • Mason jar (wide mouth) or other glass container

  • Cheese cloth (Something to cover the container, but will allow it to breathe)

  • 1 cup of flour

  • 1 cup of warm water


    What to do


  1. Put 1 cup of flour into glass container

  2. Add the 1 cup of warm water

  3. Stir well to combine

  4. Cover and leave in a warm place (between 70-90 degrees) (I leave mine in the oven with the light on)

  5. Each day you will need to remove ½ cup of the starter and replace it with ½ cup of flour and ½ cup of warm water

  6. Stir and repeat step 5 for the next three to four days (may take longer) or until your starter is ready


You will know when your starter is ready, when you notice a "beery" or yeast smell coming from it. You may also notice that a liquid forms along the top (called hooch). If this happens, just pour the liquid out.

Once your little pet is up and running (I call ours Fluffy), you can cover him with a lid (poke a hole in it, please) and place him in the refrigerator. He will only need to be fed (refer to step 5) once week.

Next in series... Baking With Your Sourdough Starter

18 May 2009

Making a Tangy Potato Salad


photo of eggs being added to the German potato salad

Thank you for stopping by...
This post has re-written WITH PICTURES as German Potato Salad . Please click through and let me know how your salad turns out. I'm sure you and everyone who tries it will love it :-)

03 January 2009

homemade fries

Tired of frozen french fries or greasy fast-food fries? Well, here is a fast and easy alternative which will leave your family raving.
What you will need...

5-7 Potatoes
1/4 cup Vinegar
Knorrs Garlic and Herb Mix

Putting it together...

  1. Take 5-7 potatoes and clean them thoroughly.

  2. Take a knife and slice them in half, lengthwise.

  3. Take each half and cut, lengthwise, 4-5 slices ( if you decide you want cubes, cut down the center of the potato, lengthwise, then make 3-4 cuts cross-wise).

  4. After you have done all the potatoes, place them in a bowl and fill with cold water and add a few glugs of vinegar ( no more than 1/4 cup).

  5. Place in the refrigerator and let soak for several hours, or overnight would be better.

  6. When you are ready to bake get a baking sheet and line with foil, spray with Pam, and set the oven to 400. Drain the water from the bowel and towel-dry the slices.

  7. Pour olive oil over the slices and toss to coat (or use your hands).

  8. Add seasoning; I use a Garlic and Herb mix by Knorr's. Toss to coat and then dump unto the baking sheet.

  9. Spread evenly and sprinkle with Kosher salt.

  10. Place in oven for 20 minutes, remove and turn-over the fries (this will ensure a nice crusty coat). Place back into oven and bake an additional 20 minutes or until done.

  11. Serve and enjoy.

24 December 2008

Green Bean Casserole

photo of Koko in a Santa hat


This recipe is doubled from the original of 6-8 servings. If that is the number of servings you need, please click on the link below and it will take you to the original site.


What you Will Need

* 4 teaspoons unsalted butter
* 3 pounds green beans, ends trimmed and cut lengthwise into thin strips and blanched
* 4 1/2 cups Cream of Wild Mushroom Soup, click on link for recipe
* 4 tablespoons Essence, plus 2 teaspoons, click on link for recipe
* 4 cups grated Fontina **Hint: Fontina is a soft cheese, so put in the freezer for about an hour or so, this will firm it up and make grating much easier

If you wish to forego having to go to all the work of frying the onions, you can use French's Fried Onions, instead and disregard the remaining ingredients.
* 4 to 5 cups vegetable oil
* 4 large yellow onions, peeled and thinly sliced (about 1/16- inch thick)
* Hot pepper sauce
* 2 cups all-purpose flour

Putting It Together

Preheat the oven to 350 degrees F. Grease a 2-quart baking dish with the butter and set aside.


  1. In a large bowl, combine the green beans, Wild Mushroom Soup, 2 teaspoons of Essence, and 3 cups of the cheese, and stir well

  2. Pour into the prepared dish, sprinkle the remaining 1 cup of cheese on top, and bake until bubbly, 25 to 30 minutes (this is the original baking time and ha NOT been doubled like the rest of the recipe, so it may take longer to heat through. After 30 minutes, I would watch it closely)

  3. In a large saucepan, add enough oil to come about 3 inches up the sides, and heat to 360 degrees

  4. Pat the onions dry

  5. Drizzle the hot sauce over the onions and then toss

  6. In another bowl, add the flour and 2 tablespoons of Essence and mix to combine

  7. Add the onions and toss to coat

  8. Remove any excess flour from the onions and add to the hot oil

  9. Cook, stirring occasionally, until crisp and golden brown, 1 1/2 to 2 minutes

  10. Remove from oil and let drain on paper towels

  11. Place onions on the top of the casserole and serve


    • If you are lazy like me, you can skip steps 3-10 and just use the traditional French's French Fried Onions
Photo courtesy of... Food Network

Recipe courtesy of... Food Network and Emeril Lagasse
.

23 December 2008

Cream of Wild Mushroom Soup

Koko sleeping covered with presentsI have been volunteered into making the infamous Green Bean Casserole for Christmas dinner. However, instead of doing it the traditional way, I plan to kick it up a notch and try Emeril's recipe. Now, the original recipe serves 8 people, so I doubled it, because I want a lot left-over to freeze. If you do not want this option, then I would suggest going to the original site (link at bottom) and following those proportions. You will have more than enough for the doubled Green Bean Casserole recipe. This recipe consists of two parts: the first part can be made ahead of time (I just finished making this about 2 hours ago) and is outlined below. The second part is put together on the day it is eaten.

Makes 16 servings

What you Need...

* 12 tablespoons unsalted butter
* 2 cup chopped yellow onions
* 1 cup chopped celery
* 1/2 teaspoon cayenne
* 3 teaspoons minced garlic
* 12 ounces shiitake mushrooms, wiped clean, stems trimmed, and sliced
* 12 ounces oyster mushrooms, wiped clean, stems trimmed, and sliced
* 16 ounces cremini or button mushrooms, wiped clean, stems trimmed, and sliced
* 4 teaspoons fresh thyme leaves
* 2 teaspoons salt
* 2 teaspoons freshly ground black pepper
* 2/3 cup brandy
* 12 cups chicken stock
* 3 cups heavy cream

Putting it Together...

  1. In a large stock-pot, melt the butter over medium-high heat.

  2. Add the onions, celery, and cayenne

  3. cook, stirring until they are soft, about 5 minutes

  4. Add garlic and cook an additional 30 seconds

  5. Add the mushrooms, thyme, salt, and pepper

  6. cook, stirring until the mushrooms shed their liquid and start to brown, around 7-8 minutes

  7. Add the brandy and bring to a boil

  8. cook until everything is glazed, about 2 minutes


    • You will notice that the veggies and the mushrooms will become shiny, this is what you are looking for

  9. Add the stock, stir, and bring to a boil

  10. Reduce heat to medium-low and simmer for 15-20 minutes, stirring occasionally

  11. Remove from the heat and puree with a hand-held immersion blender, or in batches in a food processor or blender


    • If you are going to freeze any of this soup, now is the time to do so...without adding the cream.

    • If you do freeze some, you will need to adjust the amount of cream you add to the remainder. I would suggest adding it per your taste and the desired consistency

  12. Add the cream, return to a simmer, and cook for 5 minutes


    • If you cannot have uncultured dairy products, you can replace the cream with sour cream or, if you feel fancy, Crème Fraîche. Note, you will need to add it as you would a roue; otherwise you will get lumps


  • Remove from the heat and adjust seasoning, to taste


  • Photo courtesy of... tweet-n-eats

    You will need approximately 4 1/2 cups of this soup for the casserole. I was left with just about 5 quarts that I was able to freeze.

    Recipe courtesy of... Food Network and Emeril Lagasse

    Next Time: The Green Bean Casserole

    24 November 2008

    How to Cook Your Thanksgiving Turkey

    This post will show you how I prepare the guest of honor...


    photo of a cooked turkey


    What you will need

    Turkey...any size, we usually get between 20-25 lbs.
    Turkey bag...used in the baking process
    Turkey Pan
    Meat Thermometer (the kind that can be read from outside the oven. Has a probe and then a cable that leads to the thermometer).
    Flour...1 Tbsp
    Compound Butter...Click here for recipe
    Oranges...2-3
    Onions...any leftover from other recipes
    Celery...any leftover from other recipes
    Herbs...any leftover from other recipes


    Cooking the Bird

    • First remove the surprise packages in the neck and the body cavity
    • Wash the bird inside and out
    • Remove the pop-up thermometer
      • These things are set to pop at 185°. Your bird will continue to cook while resting and the final internal temperature will be around 195° or more. This will give you a turkey that is less moist than I prefer. I use my own thermometer and remove the turkey at about 165° to 170°, which will give you a nice, moist turkey that is also well-cooked (final temperature around 175° to 180°).
    • Take the Turkey bag and put the flour inside it, then shake to coat the bag
    • Work your fingers between the skin and the breast on both sides...making a cavity
    • Take the compound butter, slice it, and insert in the cavities you created
    • Once the cavities are filled, cut the oranges in half and squeeze juice over the turkey
    • Place used oranges inside the body cavity
    • Place a few slices of your compound butter inside
    • Place any extra herbs, onions, celery, etc, inside the body cavity
      • These are used ONLY as aromatics and are NOT to be eaten
      • These additions will help flavor the turkey as it bakes
    • Place the bird in the turkey bag, cut of few slits in the bag, and place on pan
    • Insert thermometer, through the bag, into the thickest portion of the bird
    • Place the turkey in the oven and cook according to the directions
    • When the thermometer reaches 165°- 170° remove the turkey and let rest at least 30 minutes
      • Your turkey will continue to cook and carry-over will continue to raise the temperature an additional 10 degrees
    • Remove aromatics and discard
    • It will looked burned where the compound butter was placed, but believe me, it isn't
    • You should end up with a nice, moist turkey with a great flavor

    Here is a thermometer like the one I use. Very good and versatile...


    Next...Gravy

    23 November 2008

    Tangy Whipped Potatoes


    This is how I make the potatoes for Thanksgiving. The buttermilk is going to give the potatoes a nice, tangy flavor.

    What you will need:

    Potatoes...10 pounds (1 bag)
    Butter...1/2 to 1 stick
    Salt...to taste
    Pepper...to taste
    Buttermilk...1/2-1 cup
    Parmesan Cheese...1-2 cups


    Putting it Together
    • Skin potatoes and cut into quarters (this allows the potatoes to cook more quickly)
    • Put in large pot, add water and salt (I usually put in a few chicken bouillon cubes to add a little flavor to the potatoes).
    • When fork tender, remove from heat and drain
    • Turn-off burner and replace potatoes in pot and return to burner. This will allow the excess water to steam out of the potatoes. Be sure to keep an eye on them, so they do not burn
    • Place half of the potatoes in a bowl
    • Add butter, salt, and pepper
    • Either mash with a potato masher or use a hand mixer to blend
    • Add 1/2 cup of Buttermilk and continue whipping
    • Add additional buttermilk until you reach the desired consistency
    • Add additional salt and pepper to taste
    • Take other half of potatoes and repeat the above steps
    • Add the Parmesan cheese and mix until well incorporated

    Here's what they look like...

    photo of whipped potatoes


    Hope you enjoy.

    20 November 2008

    Apple Pie with Crème Fraîche and Black Pepper

    What you will need:

    Pie Crusts...2
    Granny Smith Apples...2 1/2 lbs.
    Sugar...about 3/4 cup plus 1tsp.
    Fresh Lime Juice...2 Tbsp
    Salt...Pinch
    Black Pepper...1/4 tsp. (freshly ground, if possible)
    Flour...4 Tbsp
    Calvados or Brandy...1/4 Cup
    Crème Fraîche...1/2 cup click here for recipe
    Milk...about 1 Tbsp


    • Preheat oven to 4250F

    • Place 1 pie crust in pie pan

    • Peel, core, and cut the apples into 1/4 inch slices (you may also cut them into cubes, if you like; I've done it both ways

    • Place them in a bowl and add 3/4 cup of sugar, lime juice, salt, pepper, and flour

    • Toss to coat the apples evenly

    • Add the Calvados and the crème fraîche

    • Toss to mix well

    • Cover and let set at room temperature for 20 minutes

    • Taste the mixture and add sugar if necessary

    • Transfer mixture to the prepared pie pan and distribute evenly

    • Brush the edge of the dough with milk and place the second crust on top and seal

    • decoratively crimp the edge

    • Brush the top with remaining milk and sprinkle with the remaining teaspoon of sugar

    • Cut 3 vents in the top of the crust

    • Place on a baking sheet and place in oven

    • Bake for 15 minutes, then reduce heat to 3750F, and bake for an additional 55 minutes

    • Crust should be crisp and apples tender when pierced with a knife

    • Remove from oven and allow to cool 30 minutes


    Recipe courtesy of Michael Kalanty of the California Culinary Academy

    This is a pie I first made 9-10 years ago. After that first year, it has since become a Thanksgiving tradition.
    This pie also makes a great gift. Prepare as above, but do not bake. Make a copy of the baking instructions and include that with the pie. I believe that the smell of an apple pie baking is also a gift.

    Enjoy

    Next time... Spinach and Artichoke Casserole

    18 November 2008

    Thanksgiving Prep

    photo of Koko laying on the floorThere are a few items that need to be done a few days beforehand. One is to make a compound butter, which will be used in the turkey and the other is to make Crème Fraîche, which is to be used in the Apple Pie. I will be making the compound butter on Saturday to allow the flavors in the herbs to blend with the butter. I will be making the Crème Fraîche on Sunday, so it will be ready when I make the pies on Tuesday.

    Compound Butter:

    Things you'll need:

    Butter...1 lb. (4 sticks) unsalted, please
    Fresh Sage...1 Tbsp
    Fresh Rosemary...1 Tbsp
    Fresh Thyme...1 Tbsp
    Olive Oil...1Tbsp

    These three (sage, rosemary, and thyme) are also referred to as a Poultry Mix. All measurements are considered a baseline; if you prefer a stronger flavor, you can increase the amount of herbs or reduce the amount for a milder flavor. If you cannot find fresh herbs and need to use dried herbs, you will need to reduce the baseline measurements by 1/2, as the dried herbs have a more concentrated flavor.

    • Place butter on counter to soften

    • Take the herbs (try to avoid including the stems) and chop them very fine or, if you have a food processor, place them in there and pulse until finely chopped.

    • Next take your softened butter and place in your food processor

    • Add a small amount of olive oil (1Tbls)


      • If you do not have a food processor (like me), place butter and herbs in a bowl and mix with a mixer until well combined.


    • Pulse until well combined

    • Take plastic wrap and place on the counter

    • empty butter onto the plastic wrap

    • fold the wrap over the butter

    • Using the edge of a cookie tray or other straight object, press it against the butter and tightly form into a log about 1-inch in diameter (the plastic wrap acts as a mold)

    • careful not to get the plastic wrap under the butter, roll-up and twist both ends

    • place butter in refrigerator


    Crème Fraîche:

    Things you'll need:

    Heavy Cream...1 cup
    Butter Milk...1 Tbsp
    jar w/lid...1

    • pour heavy cream into jar

    • add buttermilk

    • put lid on jar and let stand at room temperature for 24 hours, then refrigerate

    • can be stored for up to a week


    Any left-over Crème Fraîche can be used as a very rich sour cream.

    08 October 2008

    Hittin' the Sauce

    photo of a kitten ruining a photo op.As I was checking my comments today, I noticed that several people (okay, 3) commented that they were wondering, "what about spaghetti sauce?" Well, I am here to tell you that spaghetti sauce is next on my hit-list.

    We have between 40 and 50+ tomatoes that will be coming ripe by the weekend so, I have chosen Saturday as the day when I will make a huge batch of spaghetti sauce. You are probably asking yourself why you should care. However, this is the catch: I don't have any recipes that I want to use. When it comes to Alfredo Sauce, I have no problems and I can whip it up rather quickly. But when it comes to spaghetti sauce, I must say that I am stumped.

    My last attempt did not go very well, mainly because the sauce came out tasting too acidic (yes, I should have added sugar) and the flavors were off. What I would like to do is ask any of you if you have any favorite recipes you would be willing to share. I plan on placing the sauce in quart-sized jars and freezing them. Since I am working on a scale which is larger then the usual recipe, just a list of ingredients would be fine and I can combine the ingredients to taste.

    Also, I have noticed quite a few recipes which include hamburger and Italian sausage. Question: Since I am freezing the sauce, is it still alright to include the meat or should that be added at the time of service? Thanks for your help.

    07 October 2008

    Attack of the Killer Tomatoes

    photo of a cat sneering at us and talking about grammerI am currently in the process of making a HUGE mess in our kitchen. The reason...tomatoes. Yes, we have gotten our yearly flood of the round, red things and I am trying to figure out what to do with them all. To date, I have made two batches of salsa, each containing around 60 tomatoes, and we have given away bags of the things. So, what to do with the current crop?

    My wife and I sat down and tried to come up with a plan. I suggested that we can the
    remaining 100 or so, but she had a better idea: why not make a soup? So, with this plan in hand, I am currently making a Roasted Tomato and Garlic Soup. My plan is to make a huge batch of the stuff and then store it in the freezer for later consumption. (A fancy way of saying we will eat the stuff...preferably with a grilled cheese sandwich).

    Now, I am roasting, in batches, the tomatoes, garlic, onions, and carrots in the oven. This process alone has taken over 4 hours. It takes about 40-45 minutes per batch at 4250. As the veggies and tomatoes come out of the oven, I place them in a large stock pot, to which I have added tomato paste, bay leaves (Turkish), salt, pepper, and Italian Seasoning. I wanted to add basil, but naturally I don't have any.

    I have set the pots to boil and, after simmering for 1 hour, they are now cooling down. During this process, I re-seasoned it with a bit more of everything and also added some brown sugar and granulated sugar. I must say that the flavor is spot-on. Once cooled, I will process the soup in a blender and run it through a food mill. From there it will be into jars and a quick trip to the freezer.

    After 9 hours, I have finally finished. I got a little over 10 quarts of Tomato soup. When I heat-up a serving, I like to add a touch of cream to the soup; it makes it taste much richer (and you wonder why I'm on a diet). Now, for the grilled cheese.

    30 September 2008

    This Takes the Cake

    photo of Koko in the cabinet
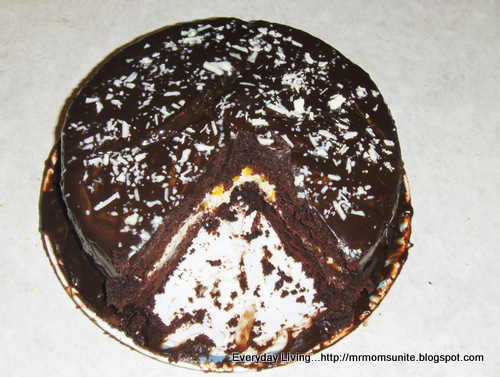
Last Thursday, my wife "asked" me to make a cake for a birthday party she was hosting at her work. Since the recipient of the party happens to a Director at the hospital, the cake needs to be good. Last year I made a Tiramisu, which happened to go very well, thank you very much. This year, she wanted me to make a Chocolate Torte with Apricot Filling. Not a problem, but the recipe she gave me was not written with the correct proportions. Since I did not have the time to work them out myself, I tried to find something else that would be just as good. I ended-up taking parts of three different recipes and combining them into something I am calling Chocolate Fudge Cake with Cream Cheese, Apricot Filling, and Chocolate Glaze. I gave this recipe a test-run this weekend and it turned-out very good. The photo below, shows the cake I made on Saturday, because I was too stupid to take a picture of the one I made for the party. Sorry, I am not the best photographer. My wife just told me that the cake was a hit; there was nothing left to bring home.


    photo of the Chocolate Fudge Cake with Cream Cheese cake


    Chocolate Fudge Cake with Cream Cheese, Apricot Filling, and Chocolate Glaze

    Da Cake Ingredients
    1 ¾ cups of All-Purpose Flour
    1-cup less 1TBS of Cocoa Powder
    1 ¼ tsp Baking Soda
    1/8 tsp Salt
    3/4 cup (1 ½ sticks) Unsalted Butter (softened)
    2/3 cups Granulated Sugar
    2/3 cups firmly packed Brown Sugar
    2 Large Eggs
    2 tsp Vanilla
    1 ½ cups Buttermilk

    • preheat oven to 350 degrees and line the bottoms of 2-9" cake pans with parchment paper and grease and dust the sides with flour

    • Mix flour, cocoa, baking soda, and salt in a bowl and set aside

    • In another bowl mix the butter, granulated sugar, brown sugar at medium speed until light and fluffy (about 5 minutes)


      • This is a very important part, because during the mixing, the sugar is tearing tiny holes in the butter (creating air pockets), which allows the cake to become lighter and less dense.

    • Add the eggs, one at a time. Mixing well after each addition


      • Tip: to avoid the unwanted egg shells in your mix, first break the eggs into a bowl and use that for your addition.

    • Add vanilla

    • At low speed, alternately add the dry mixture and the buttermilk into the butter mixture. Mix only till combined. Do not over mix

    • Divide the batter evenly into both pans

    • Bake 25-30 minutes or until a toothpick inserted into the center comes out clean.

    • Place cakes on a cooling rack and let cool for 10 minutes

    • Turn-out cakes onto racks, remove paper, and place cakes upside-down to cool
      completely

    Hey, guess what, you're 1/3 of the way there!!

    Da Filling Ingredients
    6 Ounces of Cream Cheese (softened)
    1/2 cup Granulated Sugar
    2 TBS Grated Lemon Peel (about 4 lemons) (careful and avoid the white pith...tis bitter)
    1 TBS Lemon juice
    1 TBS water (for you science types that's H20)
    1/3-2/3 cups of Apricot Preserves

    • In a bowl, place the cream cheese, lemon peel, lemon juice, and water.

    • Mix well, until thoroughly combined

    Go Team, Go...

    Da Construction

    • If you desire a clean serving plate (this was learned the hard way, as seen in the picture below), take strips of wax paper and slide them under your cake; completely covering the edges of your serving dish

    • Take the largest of your two cakes and, with it still upside down, place on serving platter and spread the apricot preserves on it

    • Spread the filling over the apricot preserves

    • Take the other cake and flip right-side up

    • Trim the top to flatten

    • Spread some additional apricot preserves on the top and then flip over and place on the bottom cake

    • Trim the sides, if the cakes are uneven

    Hey, You're almost there...

    Da Glaze Ingredients
    2/3 cup of Heavy Cream
    6 ounces (squares) Semisweet chocolate (coarsely chopped)
    2 TBS Unsalted Butter
    2 TBS Light Corn Syrup
    2 ounces White Chocolate baking squares, shaved (optional)

    • Put everything into a pan

    • Over medium heat, stir constantly until mixture comes to a boil

    • Remove from heat and stir for an additional 1-2 minutes, until glaze thickens

    • Slowly pour the glaze over your cake and smooth

    • If desired take the white chocolate shavings and sprinkle over the top of the cake
    I hope you enjoy your cake

    Shopping List for Entire Recipe
    1 ¾ Cups Flour
    1 Cup Unsweetened Chocolate
    1 ¼ tsp Baking Soda
    1/8 tsp Salt
    2 Sticks Unsalted Butter
    2 Cups Granulated Sugar
    2/3 Cups Brown Sugar
    2 Large Eggs
    1 ½ Cups Butter Milk
    2 tsp Vanilla
    1/2 Pint Heavy Cream
    6 Ounces (squares) Semisweet Chocolate
    2 Ounces (squares) White Chocolate baking squares (optional)
    2 TBS Light Corn Syrup
    6 Ounces Cream Cheese
    5 Lemons
    1-15.5 Ounce Jar of Apricot Preserves

    27 August 2008

    Do the Salsa: Part-Three

    photo of a scared kittenIf you decide that you wish to keep them for several months, then you will need to Can them and here’s how you do that…

    Take the salsa and place in a large pot. Bring to a boil and cook for 20 minutes. Take the tongs and place your pre-washed and hot jar (I usually place the clean jars in the oven and turn the oven on low) next to the pot and, using the funnel, place the salsa in the jars leaving at least ½-inch space near the top. Place the lid on the jar (again, the lid being prepared according to the manufacturers directions) and set aside. Repeat until all the salsa in placed in the jars.

    Once the water in the canning pot has come to a rolling boil, place the jars in the pot and replace the cover. Once the water comes to a boil again, then set your timer for 50 minutes. Buzz, Buzz… OK now remove the jars and repeat as necessary. When cooled, store in a dark, cool place. Hope you enjoy your salsa.

    See also:
    Do the Salsa:Part-1

    Do the Salsa:Part-2

    26 August 2008

    Do the Salsa: Part-Two

    photo of a cat with totally dilated eyesIf you decide to Can…

    • Mason Jars w/lids

    • Mason Jar Extractor (to retrieve the jars from the hot water bath

    • Canning Pot (to boil the canned salsa)

    • Tongs (to handle the hot jars)

    • Canning Funnel


    First, take your lovely tomatoes and skin them. I know that is very cruel, but it is something that needs to be done. If you don’t know how to do this, than boil some water. When it comes to a boil, add your tomatoes and boil them for 30 seconds. Immediately take them out of the boiling water and place them in the sink (which you first filled with cold water). The skins should just come right off.

    Next, cube the tomatoes and place them in a large bowl. You then need to finely slice the green onions and add on top of the tomatoes. Next, add the chilies, if they are not already sliced, then you will need to slice them. Finally, add the salt and vinegar and mix well. If you will be using all the salsa within a few days to a week, store in the refrigerator and enjoy.

    Next Time: If you decide that you wish to keep them for several months...

    See also...
    Do the Salsa:Part-1

    Do the Salsa:Part-3

    25 August 2008

    Do the Salsa

    picture of a pouting cat sitting on a couchThis past week, our tomato plants just went wild and we ended-up with about 60 ripe tomatoes. Now, in addition to adding tomatoes to hamburgers, sandwiches, and creating my famous Tuna-Stuffed-Tomato, I had to find something to do with them all. Naturally, we shared some with the neighbors, but my wife had other ideas…Salsa.

    Using her feminine wiles and various threats, she told me that she wanted me to make salsa. Well, given the fact that I misplaced the recipe I usually used (actually, it was bits and pieces from several recipes that I used), this was going to be a challenge. Thankfully, I remembered the main ingredients; I just forgot the proportions. Since it turned-out very well, if I do say so myself, I will bore you with the recipe. This will serve me in two ways: First, I will have something to post and Second, I will be able to find the recipe the next time I make it.

    Stuff you will need:

    • Tomatoes (duh)

    • Green onions…4-5 bunches

    • Chilies, fire roasted…6- 6 oz. cans. We used mild, but if you like yours hotter, than get medium to hot, or mix and match.

    • Pickling Salt…1-1 ½ Tablespoons

    • White Wine Vinegar…1 cup


    Next time: If you decide to Can…

    See also...
    Do the Salsa:Part-2

    Do the Salsa:Part-3

    05 April 2008

    Chicken with Rice

    Here is an easy recipe that your family is sure to love.
    Chicken with Rice.

    What you'll need:
    • 4 chicken breasts, cut into small pieces
    • 1 cup of uncooked rice
    • 1 sliced white or yellow onion
    • 6-7 sliced mushrooms
    • 5-6 cloves of garlic, sliced not crushed
    • 1 can of Cream of Mushroom soup
    • 1 can of Cream of Celery soup
    • 1 can Chicken with Rice soup
    • 1 packet of Lipton's Onion Soup Mix
    • 1 stick of unsalted butter, cut into small pieces

    First, coat a 13 x 9 x 2 inch pan well with butter.

    Spread evenly in the following order:

    • 1 cup of uncooked rice
    • 1/2 cup of the unsalted butter, cut into small pieces
    • the chicken breasts
    • 1 sliced onion
    • the mushrooms
    • the garlic

    In a separate bowl mix 1 can of the following

    • Cream of Mushroom Soup
    • Cream of Celery Soup
    • Chicken with Rice Soup

    Add 1 and 1/2 cups of water to the soups and mix thoroughly. Pour evenly over the chicken to cover the entire dish. Add 1 packet of Lipton's Onion Soup Mix.

    Cover with foil and cook at 325 degrees for 2 and 1/2 hours. (or 2 hours at 350)

    Serve with Parmesan cheese

    Potatoes Gone Wild

    photo of eggs being added to the German potato salad

    Thanks for stopping by,
    This post has re-written WITH PICTURES as German Potato Salad. Please click through and let me know how your salad turns out. I'm sure you and everyone who tries it will love it :-)

    03 April 2008

    Potatos, Potatoes

    This post has moved.Please click and vist: Homemade Fries.
    Related Posts Plugin for WordPress, Blogger...

    Google Analytics